The proper assembly of your Roc-N-Soc drum throne is the crucial first step toward unlocking the unparalleled comfort and ergonomic support for which the brand is celebrated, directly impacting your posture, stability, and overall performance behind the kit.
Unboxing a new piece of high-quality drum hardware is an exhilarating experience for any musician, but the anticipation to use it can sometimes lead to a rushed setup.
This comprehensive guide is designed to eliminate any guesswork from the Roc-N-Soc drum throne assembly process.
We will meticulously walk through every stage, from identifying each component in the box to making the final micro-adjustments for a truly personalized fit.
By following these instructions, you will ensure your throne is not only assembled correctly and safely but is also optimized for your specific playing style, covering topics such as base and seat attachment, height adjustment techniques, optional backrest installation, and troubleshooting common setup issues.
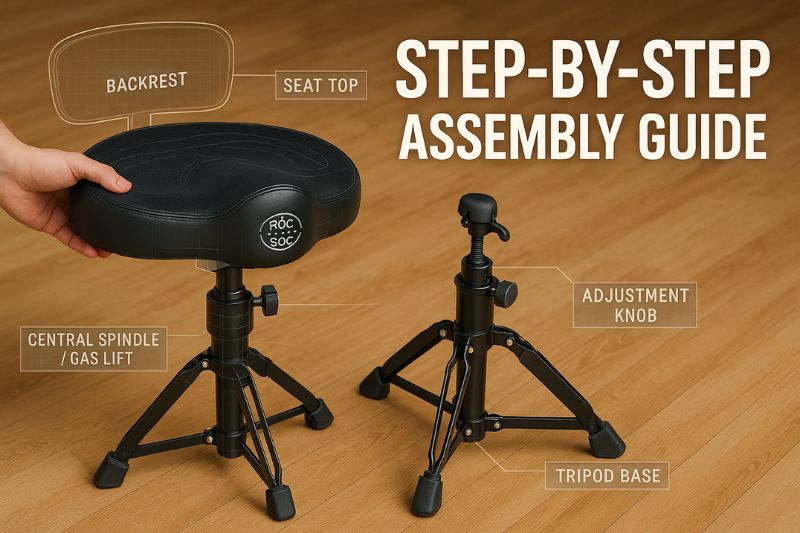
Pre-Assembly Checklist: What’s in the Box?
Organizing your components before beginning the assembly process streamlines the entire procedure and confirms you have all necessary parts for a successful build.
Roc-N-Soc designs its products for intuitive, user-friendly assembly, meaning you will not be faced with a daunting array of small, confusing pieces.
Instead, you will find a few robust, primary components that fit together logically.
Before you begin, lay out all the parts on a clean, flat surface, preferably on a rug or carpet to prevent any accidental scratches to your flooring or the throne itself.
A quick inventory check against the list below will give you the confidence that you’re ready to proceed.
Primary Components List
- Seat Top:
- This is the cushioned seat itself.
- Roc-N-Soc offers several styles, and you should identify yours.
- The most common are the Original Saddle Seat, known for its bicycle-seat shape that promotes good posture, and the Hugger Seat, which is oversized with raised edges for maximum support.
- Other variations include round tops and square tops.
- The underside will feature a pre-installed mounting plate.
- Spindle/Gas Lift Mechanism:
- This is the central column that facilitates height adjustment and swiveling.
- Depending on the model you purchased, this will either be a manual spindle (which you spin to raise or lower) or a nitrogen gas-powered shock (which uses a lever for smooth, instantaneous adjustments).
- Both types serve the same core function.
- Base with Legs:
- This is the foundation of your throne.
- It consists of a central collar where the spindle is inserted and three or five sturdy, collapsible legs.
- The base is designed to provide a wide, stable footprint to prevent any wobbling or tipping during vigorous playing.
- Optional Backrest Kit:
- If you purchased a model with a backrest, you will have an additional set of components.
- This typically includes the backrest pad itself and the necessary mounting hardware (a metal bracket and one or two tightening knobs or screws) to attach it securely to the underside of the seat top.
Tools Needed
One of the most significant advantages of the Roc-N-Soc system is its tool-free assembly design.
The components are engineered with precision to fit together securely without the need for wrenches, screwdrivers, or Allen keys.
| Tool | Necessity | Purpose |
|---|---|---|
| None | Required | The throne is designed for hand-assembly. |
| Rubber Mallet | Optional | In rare cases, a gentle tap may be needed to fully seat the spindle into the base for a perfectly snug fit.
Never use a metal hammer, as it can damage the components. |
| Soft Cloth | Recommended | Useful for wiping down components and handling parts without leaving fingerprints. |
Step-by-Step Assembly Instructions
Following these steps in sequence will ensure a correct and secure assembly, transforming your boxed components into a fully functional, performance-ready drum throne in a matter of minutes.
Each step is designed to be simple and logical, building upon the previous one to create a stable and reliable final product.
Step 1: Unbox and Inspect
Careful inspection of each component upon unboxing is a critical quality control measure that protects you from issues down the line.
Before the excitement takes over, take a moment to meticulously unbox every part and lay it out.
Compare what you have with the “What’s in the Box?” checklist from the previous section.
Check for any signs of shipping damage, such as dents in the base, tears in the seat upholstery, or scratches on the spindle.
While Roc-N-Soc products are packed securely, rough handling during transit can occasionally cause cosmetic or, rarely, functional damage.
If you notice any significant issues, contact your retailer immediately before proceeding with the assembly.
Step 2: Assemble the Base
The stability of the entire throne originates from a properly assembled base, which provides the foundational footprint to support the player’s weight and movement.
Take the collapsed base and place it on the floor.
To open it, simply pull the legs outward and downward until they extend fully and lock into their final, stable position.
You should feel a definitive “click” or see the support struts become taut, indicating the legs are secure.
Once unfolded, give the base a gentle push to confirm it sits flat and does not rock or wobble.
This step is fundamental; an unstable base will compromise the safety and feel of the entire throne.
Step 3: Insert the Spindle/Gas Lift
Inserting the height-adjustment mechanism into the base is a straightforward process that connects the throne’s upper and lower assemblies.
Pick up the spindle or gas lift and orient it so the wider end is at the bottom.
Lower this end directly into the central collar of the assembled base.
The component should slide in smoothly under its own weight.
To ensure a completely secure, friction-fit connection, apply firm downward pressure on the top of the spindle.
If it feels slightly tight, this is by design.
As mentioned in the tools list, a very gentle tap with a rubber mallet on the top of the spindle can help seat it fully, but in most cases, simple hand pressure is sufficient.
Step 4: Attach the Seat Top
Attaching the seat top is the final major assembly step, and it is designed to be exceptionally simple, using the player’s own weight to create a secure connection.
Lift the seat top and look at its underside to locate the black metal mounting plate.
You will see a receiving hole in the center of this plate.
Align this hole directly over the exposed top of the spindle you just inserted into the base.
Carefully lower the seat onto the spindle.
Once it’s resting on top, press down firmly with both hands.
The most effective way to finalize the connection is to simply sit on the throne.
Your body weight will apply the necessary force to lock the seat’s mounting plate securely onto the tapered end of the spindle, completing the assembly.
Step 5 (Optional): Installing the Backrest
Installing the optional backrest provides significant lumbar support, enhancing comfort and reducing fatigue during long playing sessions.
If your throne included a backrest kit, you will now attach it.
First, identify the mounting points on the underside of the seat top; there will be pre-drilled, threaded holes specifically for the backrest bracket.
Align the holes on the metal backrest bracket with these mounting points.
Insert the provided knobs or screws and hand-tighten them until they are snug.
Slide the post of the backrest itself into the receiver on the bracket and use the final adjustment knob to set its height and angle before fully tightening it.
Adjustments and Final Checks
Performing final adjustments and checks transforms your assembled throne into a personalized piece of ergonomic equipment tailored to your body and playing style.
A properly adjusted throne is not merely a place to sit; it is a tool that promotes better technique, reduces physical strain, and enhances your connection to the instrument.
Finding Your Optimal Height
The height of your drum throne is arguably the most critical ergonomic adjustment you can make.
The correct height ensures proper leg positioning, which affects your balance and your ability to operate pedals effectively.
Adjustment Methods:
- Gas Lift Models:
- Simply pull the lever located just under the seat.
- The gas shock will allow you to raise or lower the height with ease.
- For best results, pull the lever while taking your weight off the seat to raise it, and pull the lever while seated to lower it.
- Manual Spindle Models:
- To adjust the height, you must spin the entire seat top.
- Spinning it clockwise will lower the height, while spinning it counter-clockwise will raise it.
Ergonomic Guidelines:
- Thigh Position:
- Sit on the throne and adjust the height until your thighs are angled slightly downward, just past being parallel to the floor.
- Hip and Knee Angle:
- Your hips should be positioned slightly higher than your knees.
- This “open” angle (greater than 90 degrees) promotes better blood flow and reduces pressure on your lower back.
- Foot Placement:
- You should be able to place both feet flat on the floor (or on your pedals) comfortably, with your ankles directly below your knees.
Final Stability and Swivel Test
A final check of the throne’s stability and functionality guarantees it is safe and ready for performance.
| Check | Procedure | Desired Outcome |
|---|---|---|
| Stability Test | Sit on the throne and shift your weight from side to side and forward to back. | The throne should remain completely stable with no rocking, wobbling, or tipping.
All legs should maintain firm contact with the floor. |
| Swivel Test | While seated, rotate your body from side to side. | The seat should swivel smoothly and silently without any grinding, catching, or excessive looseness. |
| Connection Check | Attempt to lift the seat top directly off the spindle. | The seat should be firmly locked in place and should not come off.
If it does, it was not seated properly in Step 4. |
| Hardware Tightness | If you installed a backrest, give all knobs and screws a final check to ensure they are securely tightened. | The backrest should feel solid and supportive, with no wiggle or play in the mounting bracket. |
Troubleshooting Common Assembly Issues
Even with a straightforward assembly process, you might encounter a minor issue.
This troubleshooting guide addresses the most common problems and provides simple, effective solutions to ensure your throne is set up perfectly.
| Problem | Potential Cause | Solution |
|---|---|---|
| The seat feels wobbly or unstable. | The seat top is not fully seated on the spindle’s taper lock. | Stand up and give the seat top a firm downward push with both hands.
Alternatively, sit on it and wiggle slightly to use your body weight to force a secure connection. Verify the base legs are also fully extended and locked. |
| The gas lift height adjustment is not working. | The gas lift mechanism may not be fully engaged or is defective. | First, ensure the spindle is fully inserted into the base.
Second, check that the activation lever under the seat is not stuck and moves freely. If it still fails to operate, contact Roc-N-Soc or your retailer, as the gas shock may need replacement. |
| The base itself rocks on a flat floor. | One or more legs are not fully extended and locked into place. | Lift the throne and re-check the base.
Manually pull each leg outward and downward to ensure it has clicked securely into its fully open and locked position. |
| The throne makes a creaking or grinding noise when swiveling. | Debris may be present in the spindle/base connection, or the parts need to settle. | Lift the seat top off and wipe down the spindle and the inside of the base’s collar with a clean, dry cloth to remove any dust or particles from shipping.
Reassemble and test again. Often, minor noises will disappear after a few minutes of use as the parts settle. |
| The manual spindle is difficult to turn. | The threads may be too tight or have minor debris. | Unscrew the spindle completely from the seat’s mounting plate.
Wipe the threads of both the spindle and the plate clean. Apply a very small amount of white lithium grease or similar lubricant to the threads before reassembling. |
Conclusion
You have now successfully completed the Roc-N-Soc drum throne assembly, a process that is fundamental to ensuring the longevity and performance of your investment.
By diligently following each step—from the initial inspection and base setup to the critical seat attachment and final ergonomic adjustments—you have constructed a stable, secure, and comfortable foundation for your drumming.
This correctly assembled throne is more than just seating; it is an ergonomic tool engineered to enhance your posture, reduce fatigue, and allow you to focus entirely on your music.
The stability you’ve ensured will translate into better balance and pedal control, while the personalized height adjustment will protect your back and joints for years to come.
We encourage you to revisit the adjustment section periodically, as your comfort preferences may evolve.
Should you have any further questions or insights from your assembly experience, please share them in the comments section below to help our community of drummers.
Now, enjoy the superior comfort and rock-solid support of your new Roc-N-Soc throne.