Properly assembling your Gibraltar drum throne is the crucial first step toward achieving optimal comfort, stability, and performance behind your drum kit, forming the very foundation of your posture and playing endurance.
An incorrectly assembled throne can lead to wobbling, premature wear, and even physical discomfort, undermining the quality of your practice and performance sessions.
This comprehensive guide is designed to navigate you through every phase of the Gibraltar drum throne assembly process, from the initial unboxing to the final height adjustments.
We will delve into a detailed parts checklist, provide meticulously crafted step-by-step instructions applicable to most Gibraltar models, and offer specific guidance for popular and unique thrones like the 9608MB.
Furthermore, this article will equip you with essential troubleshooting solutions for common assembly issues, present a robust care and maintenance regimen to extend the life of your equipment, and ensure you have all the knowledge necessary to set up your throne with the confidence and precision of a seasoned professional.
Unboxing and Parts Checklist: Starting Your Setup on the Right Foot
The initial unboxing of your new Gibraltar throne is an exciting moment that sets the stage for a successful assembly; it involves carefully unpacking all components and verifying that every piece is present and accounted for before you begin construction.
Taking a few moments to organize the parts not only prevents the frustration of a mid-assembly search for a missing screw but also familiarizes you with the components you’ll be working with.
It is highly advisable to lay all the parts out on a clean, flat surface, creating an organized workspace that will streamline the entire process.
Before proceeding, consult the table below to identify the standard components included with most Gibraltar drum thrones.
While specific parts may vary slightly between different models, this checklist covers the fundamental elements you should expect to find.
Table 1: Standard Gibraltar Drum Throne Components
| Component | Description | Primary Function |
|---|---|---|
| Seat Top | The cushioned surface where the drummer sits.
Can be round, moto-style, or tractor-style. |
Provides comfort and support during play. |
| Tripod Base | The three-legged foundation of the throne, often collapsible for transport. | Ensures stability and prevents the throne from tipping over. |
| Spindle / Post | The threaded or smooth metal rod that connects the seat top to the base. | Allows for precise height adjustment. |
| Memory Lock | A metal collar that clamps onto the spindle at a desired height. | “Remembers” your preferred height setting for quick and consistent setup. |
| T-Bolt / Wing Nut | The screw mechanism used to tighten and secure the spindle within the base. | Locks the height adjustment spindle firmly in place. |
| Rubber Feet | The durable rubber caps at the end of each tripod leg. | Provide grip, prevent slipping, and protect floor surfaces. |
| Backrest (Optional) | An additional support piece that attaches to some models. | Offers lumbar support for enhanced comfort during long sessions. |
Pro-Tip: Always cross-reference the parts you’ve unboxed with the official manufacturer’s manual included in the packaging.
If you discover any discrepancies or missing components, contact your retailer or Gibraltar Hardware support immediately before attempting assembly.
This preemptive check can save significant time and prevent potential damage from using an incomplete or incorrect set of parts.
Step-by-Step Assembly Instructions: Building Your Foundation of Comfort
Following a systematic, step-by-step approach is the most reliable method for ensuring your Gibraltar drum throne is assembled correctly, safely, and efficiently.
Each component is designed to fit together in a specific sequence to guarantee maximum structural integrity and user comfort.
Rushing through the steps or assembling parts in the wrong order can compromise the throne’s stability and lead to the very issues, like wobbling or sinking, that proper assembly is meant to prevent.
The following instructions will guide you through the universal assembly process applicable to the vast majority of Gibraltar thrones.
Step 1: Unfold and Secure the Tripod Base
The first action in the assembly sequence is to establish a solid foundation by correctly deploying the tripod base.
Grasp the central collar of the base and pull the three legs outward until they are fully extended and lock into their most stable position.
On most models, you will feel a distinct point where the legs are at their maximum spread.
It is critical to ensure the legs are spread as far as they will go; a partially unfolded base is the most common cause of an unstable throne.
Once unfolded, place the base on the floor and confirm that all three rubber feet are making firm, even contact with the ground.
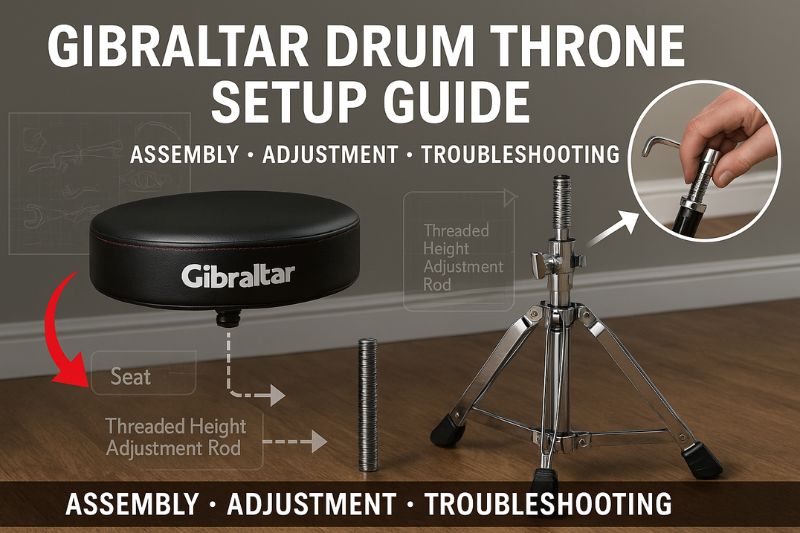
Step 2: Insert and Position the Height Adjustment Spindle
With the base prepared, the next step involves inserting the height adjustment spindle, which is the core component for setting your playing height.
Loosen the T-bolt or wing nut on the side of the base’s central tube—turn it counter-clockwise just enough to allow the spindle to slide in without resistance.
Insert the smooth, non-threaded end of the spindle into the tube.
Before tightening anything, this is the ideal time to slide the memory lock onto the spindle.
The memory lock is a crucial feature for a consistent setup, so don’t forget it.
Let it rest near the bottom of the spindle for now; we will set its final position later.
Step 3: Secure the Seat Top to the Spindle
Attaching the seat top transforms the separate components into a recognizable throne.
The underside of every Gibraltar seat top features a mounting bracket designed to receive the top of the spindle.
Align this bracket with the top of the spindle and slide the seat down until it is fully seated.
The connection should be snug.
Once the seat is in place, you must tighten the wing nut on the seat bracket firmly.
This is a critical connection point; a loose seat bracket will cause the seat to rock or spin unexpectedly while you are playing, which can be both distracting and unsafe.
Ensure it is hand-tightened to the point where the seat feels like a single, solid unit with the spindle.
Step 4: Calibrate Your Height and Engage the Memory Lock
The final and most personalized step is to adjust the throne to your ideal playing height and lock it in place.
To do this, sit on the throne in your normal playing posture at your drum kit.
Your thighs should be angled slightly downwards, allowing your feet to comfortably operate the pedals without straining your back or legs.
Adjust the throne’s height by spinning the entire seat top clockwise to lower it or counter-clockwise to raise it.
Once you have found the perfect, ergonomic height, the memory lock comes into play.
- Setting the Memory Lock:
- Slide the memory lock up the spindle until it is flush against the bottom of the central tube of the tripod base.
- Tighten Securely:
- Use a drum key to firmly tighten the screw on the memory lock.
- This collar will now act as a physical stop, preventing the spindle from sliding any lower than your set position.
- Final Base Tightening:
- With the height set and the memory lock engaged, give the main T-bolt on the tripod base a final, firm tightening to eliminate any remaining play in the spindle.
By following these four steps, you will have completed the Gibraltar drum throne assembly, resulting in a stable, comfortable, and reliable piece of equipment ready for countless hours of drumming.
Assembling Specific Gibraltar Models: The 9608MB and Beyond
While the general assembly instructions cover most of the product line, certain popular or specialized Gibraltar models, such as the 9608MB Moto-Style Throne with its optional backrest, feature unique components that require additional steps.
Understanding these model-specific nuances is key to unlocking their full ergonomic potential and ensuring every feature is correctly installed.
These thrones are often chosen for their enhanced comfort and support, making proper assembly of their special features paramount.
A Closer Look: Assembling the Gibraltar 9608MB Moto-Style Throne
The Gibraltar 9608MB is a favorite among drummers for its motorcycle-style seat and the option to add a backrest, but this latter feature introduces a unique assembly step.
- Standard Assembly First:
- Begin by following the primary four-step assembly guide detailed in the previous section.
- Assemble the base, insert the spindle, and attach the moto-style seat top.
- Preparing for the Backrest:
- On the underside of the 9608MB seat top, you will find a dedicated mounting point for the backrest.
- It typically consists of a receiving bracket with a large, adjustable wing screw.
- Attaching the Backrest Post:
- The backrest itself is attached to a solid metal post.
- Insert the end of this post into the receiving bracket on the underside of the seat.
- Adjust and Secure:
- Slide the backrest post to the desired depth—this controls how far forward the back support sits—and then firmly tighten the large wing screw to lock it in place.
- The connection should be completely rigid, with no wobble in the backrest.
Table 2: Model-Specific Assembly Considerations
| Model Series | Key Feature | Assembly Nuance | Benefit of Proper Assembly |
|---|---|---|---|
| 9600 Series (e.g., 9608MB) | Optional Backrest | Requires attaching the backrest post to a dedicated bracket under the seat. | Provides crucial lumbar support, reducing fatigue and promoting better posture during long sessions. |
| Hydraulic Thrones (e.g., 9808ARW) | Air-Ride Mechanism | The hydraulic gas lift mechanism comes pre-assembled.
The primary task is ensuring the seat top is securely fastened to the hydraulic post. |
Guarantees smooth, effortless height adjustments and a slight “float” that absorbs shock. |
| Oversized Thrones (e.g., 9808OS) | Extra-Large Seat | The assembly process is standard, but due to the seat’s size and weight, it may be easier to attach it with the help of another person. | Ensures the larger, heavier seat is balanced and securely mounted for maximum stability and comfort. |
Common Problems and Troubleshooting Your Assembly
Even with careful assembly, you may occasionally encounter issues such as a wobbly seat or a sinking spindle; fortunately, these common drum throne problems are almost always resolvable with simple adjustments.
These problems typically stem from a connection point that wasn’t fully tightened during the initial setup or has loosened over time with use.
Addressing these issues promptly not only improves your playing experience but also prevents minor annoyances from becoming larger mechanical failures.
Before assuming a part is defective, work through the following troubleshooting checklist.
Troubleshooting Checklist: From Wobbles to Sinks
This list outlines the most frequent assembly-related problems and their corresponding solutions.
- Problem: The Throne is Wobbly or Unstable
- Solution:
- This is the most common issue and usually has a simple fix.
- Systematically check and tighten every connection point, starting from the ground up.
- Ensure the tripod legs are fully extended and that the main T-bolt securing the spindle is firmly tightened.
- Finally, confirm the wing nut on the seat bracket is secure.
- Solution:
- Problem: The Seat Sinks While Playing
- Solution:
- This indicates a failure in the height-locking mechanism.
- The primary culprit is often a poorly engaged memory lock.
- Ensure the memory lock is flush against the base and tightened securely with a drum key.
- If the problem persists, check that the main T-bolt on the base is also tight enough to grip the spindle.
- Solution:
- Problem: The Seat Rotates or Spins Too Freely
- Solution:
- While some rotation is desirable for mobility, uncontrolled spinning is not.
- This issue originates at the connection between the seat top and the spindle.
- Flip the throne over and firmly tighten the wing nut on the seat mounting bracket until the seat rotation has the desired level of resistance.
- Solution:
- Problem: The Hydraulic Lift Feels Sluggish or Won’t Adjust
- Solution:
- For hydraulic models, ensure you are fully activating the adjustment lever.
- If it still feels off, check that the seat is properly mounted and not binding the mechanism.
- In rare cases, a hydraulic cartridge can fail, which would require contacting Gibraltar support for a replacement part.
- Solution:
Table 3: Quick Troubleshooting Guide
| Symptom | Primary Checkpoint | Secondary Checkpoint | Tool Required |
|---|---|---|---|
| General Wobble | Tripod Leg Spread | Main T-Bolt on Base | Hand / Drum Key |
| Seat Sinking | Memory Lock Position & Tightness | Main T-Bolt on Base | Drum Key |
| Unwanted Seat Spin | Seat Bracket Wing Nut | N/A | Hand |
| Creaking Noises | All Tightening Points | Lubrication on Spindle Threads | Drum Key / Lubricant |
Care and Maintenance: Protecting Your Investment
Implementing a routine of regular care and maintenance is essential for extending the lifespan of your Gibraltar drum throne and ensuring it remains a reliable and silent partner in your drumming journey.
Just like any other piece of heavily used hardware, your throne is subject to vibrations and mechanical stress that can cause components to loosen or wear over time.
A few minutes of preventative maintenance every few months can prevent squeaks, wobbles, and catastrophic failures, protecting your investment and keeping your focus solely on the music.
A Simple Maintenance Regimen
Follow this list to keep your throne in peak condition:
- Regular Tightening Schedule:
- At least once a month, perform a comprehensive check of every nut, bolt, and screw on your throne.
- This includes the main T-bolt, the seat bracket wing nut, and the memory lock screw.
- Vibrations from playing can slowly loosen these connections, and keeping them snug is the single most effective maintenance task you can perform.
- Cleanliness is Key:
- Keep your throne clean.
- Wipe down the metal base and spindle with a dry, lint-free cloth to remove dust and debris.
- For the seat top, use a slightly damp cloth for vinyl surfaces or a vacuum with a brush attachment for cloth tops.
- Avoid harsh chemical cleaners that can degrade the material.
- Strategic Lubrication:
- If you have a throne with a threaded spindle for height adjustment, applying a small amount of white lithium grease or a similar lubricant to the threads once or twice a year can ensure smooth, effortless rotation.
- This prevents the threads from binding or stripping over time.
- Wipe away any excess lubricant to avoid attracting dirt.
- Inspect for Wear and Tear:
- During your routine checks, visually inspect all parts for signs of damage.
- Look for cracks in the tripod base welds, excessive wear on the rubber feet, or any stripping on the threads of the T-bolts.
- Replacing a worn part, like a rubber foot, is an inexpensive fix that can prevent floor damage and maintain stability.
Conclusion: Your Foundation for Great Drumming
In conclusion, the proper and meticulous assembly of your Gibraltar drum throne is not merely a preliminary task but a foundational act that directly impacts your comfort, stability, and overall performance.
By diligently following the step-by-step instructions, from unboxing and verifying each part to the final, personalized height adjustment using the memory lock, you create a secure and ergonomic base for your drumming.
We have explored the universal assembly process, addressed the specific nuances of popular models like the 9608MB, and provided a clear, actionable guide to troubleshooting common issues like wobbling and sinking.
Ultimately, a well-assembled and maintained throne becomes an extension of the player, providing silent, steadfast support that allows you to focus entirely on your craft.
The benefits of this initial investment of time and attention are immeasurable, preventing technical frustrations and promoting a healthier, more sustainable drumming posture.
We encourage you to use this guide to set up your throne with confidence and to revisit the maintenance tips to ensure it serves you reliably for years to come.
What are your go-to tips for throne setup? Share your thoughts and questions in the comments below.