Acquiring an electronic drum set initiates a rewarding journey into rhythmic expression, offering unparalleled flexibility for practice, performance, and recording.
These instruments, often integral components of the best electronic drum sets, provide realistic drumming experiences through sophisticated samples triggered by strikes on pads and pedals.
Understanding the correct electronic drum setup is absolutely vital; it guarantees optimal performance, maximizes the lifespan of your equipment, and establishes a comfortable, ergonomic playing posture that prevents strain and enhances your drumming technique.
Improper setup compromises playability and can even damage components, undermining the significant investment you’ve made in your kit.
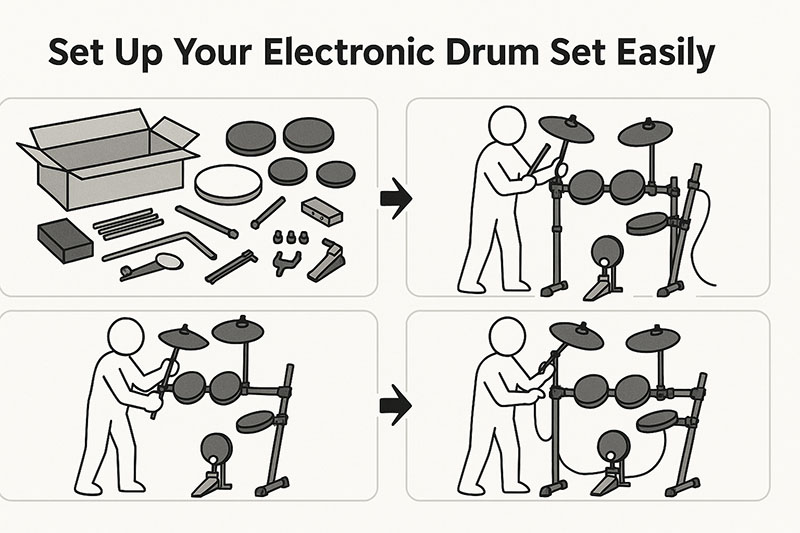
This guide meticulously details every necessary step involved in the electronic drum kit assembly process.
We will thoroughly explore unpacking and inventory procedures, systematically cover the construction of the drum rack, and precisely explain the correct placement and attachment of pads and pedals.
Furthermore, we will delve into the critical task of mounting and connecting the drum module, often referred to as the “brain,” followed by comprehensive instructions on wiring the entire kit.
Subsequent sections will focus on crucial ergonomic adjustments for personalized comfort and discuss various options for connecting your electronic drums to headphones, amplifiers, or computers.
Finally, we will address effective electronic drum cable management techniques and offer essential troubleshooting tips to ensure your setup is clean, functional, and ready for countless hours of playing.
Mastering the electronic drum setup process ensures you unlock the full potential of your instrument, providing a seamless and inspiring drumming experience.
Preparation is Key: Unboxing and Inventory
Proper preparation significantly streamlines the electronic drum setup process, preventing frustration and potential errors.
Before you begin unpacking, you must identify a suitable location for your electronic drum set.
This location requires adequate space for the drum rack and room for you to sit and move comfortably.
Consider the flooring; a carpeted area or the addition of a dedicated drum mat is highly recommended as it provides stability for the rack and helps absorb vibrations generated by the kick drum pedal, which can otherwise transfer through floors and annoy others in adjacent rooms or downstairs.
Proximity to a power outlet is also a practical consideration for powering the drum module.
Carefully unboxing all components constitutes the initial physical step, preventing damage to the pads, hardware, or the sensitive drum module.
Lay out all the boxes and open them methodically, placing packaging materials aside but keeping them accessible in case you need to transport the kit later or if any issues require returning parts.
Handle all components with care, particularly the electronic pads and the module, avoiding drops or impacts.
Verifying the contents against the packing list is absolutely essential, ensuring you have received every component specified by the manufacturer.
Consult the user manual or a separate packing list included with your electronic drum kit.
Tick off each item as you identify it.
This step catches any missing parts early in the process, allowing you to contact the retailer or manufacturer for replacements before you encounter an inability to complete the electronic drum kit assembly.
Organizing the components logically simplifies the subsequent assembly steps, reducing confusion and saving time.
Group similar parts together.
Keep all rack tubes and clamps in one area, all drum pads (snare, tom pads) in another, cymbal pads separately, and all cables bundled together.
The drum module and its power supply should be kept in a safe place, away from potential damage during the initial physical assembly of the rack.
This systematic approach makes finding the correct piece when needed much faster and more efficient.
Building the Foundation: Assembling the Drum Rack
Constructing the drum rack provides the fundamental structure upon which all other components of your electronic drum set will be mounted.
You begin the assembly process by identifying the main structural components of the rack, which typically include horizontal bars, vertical legs, and various clamps and connectors designed to join these pieces together.
These components form the skeleton of your kit, providing adjustable mounting points for pads, cymbals, and the module.
Following the manufacturer’s specific instructions is paramount during rack assembly, as designs can vary between different electronic drum sets.
The included manual will contain detailed diagrams illustrating how the various tubes and clamps connect.
Pay close attention to the orientation of the tubes and the correct placement of connecting joints.
Some racks utilize memory locks; these handy components retain the position of clamps on the tubes, greatly speeding up setup time after the initial assembly if you ever need to disassemble and reassemble your kit.
Initially hand-tightening the clamps allows for flexibility in positioning before final securing, preventing misalignment or difficulty in making adjustments.
As you connect the tubes using the clamps, tighten them just enough so the structure holds together but can still be adjusted.
This allows you to modify the overall shape and footprint of the rack to fit your space and preferred ergonomic layout before firmly locking everything into place.
Avoid using excessive force at this stage.
Ensuring the rack is stable and sits level on the floor is critical for the overall stability and playability of your electronic drum set.
Once the main structure is assembled and the hand-tightened clamps allow it to stand independently, gently shake the rack to check for wobbles.
Adjust the legs and horizontal bars as needed to achieve a balanced and stable foundation.
If you are using a drum mat, ensure the rack’s feet are firmly on the mat.
A wobbly rack can cause pads to shift during playing and may even affect trigger performance.
Here is a table summarizing common drum rack components and their function:
| Component Type | Typical Appearance | Function | Notes |
|---|---|---|---|
| Horizontal Bar | Straight or curved metal tube | Forms the main framework, supports pads and cymbals. | Can be part of the front bar or side extensions. |
| Vertical Leg | Straight metal tube with feet | Provides vertical support and stability for the rack. | Often adjustable in height. |
| Clamp/Connector | Metal or heavy-duty plastic joint | Connects tubes together, allows for positioning and securing. | Varies in size and design; may require drum key or hand-tightening. |
| L-Rod/Mounting Arm | L-shaped or straight metal rod | Attaches pads and some cymbals to the rack clamps. | Pads slide onto or attach to these rods. |
| Cymbal Boom Arm | Angled or straight arm with tilter | Holds cymbal pads and allows for angle and height adjustment. | Often fits into a separate clamp on the rack. |
| Memory Lock | Ring-shaped collar | Secures the position of a clamp on a tube for repeatable setup. | Optional but very useful. |
Placing the Core: Kick Drum and Hi-Hat Pedal
Establishing the correct positions for your kick drum and hi-hat pedals is fundamental to a comfortable and efficient drumming posture.
You initiate this step by positioning your drum throne at a height that allows for proper leg angle and comfort. Sit on the throne and adjust its height so your thighs are roughly parallel to the floor or angled slightly downwards.
Your feet should rest flat on the floor.
This height allows for a relaxed yet controlled movement of your ankles and legs, crucial for both kick drum technique and hi-hat pedal work.
Placing the kick pedal in a position that feels natural and comfortable for your dominant foot follows the stool adjustment. Sit squarely on the throne and allow your dominant foot (typically the right for right-handed drummers) to rest naturally on the floor where you intend to place the kick pedal.
Ensure your ankle is relaxed and that you can comfortably operate the pedal using either heel-up or heel-down technique.
The position should allow for power and control without strain on your leg or ankle.
Setting up the kick pad or kick tower in alignment with the chosen kick pedal position is the next logical step. If your kit includes a kick pad that requires a separate pedal clamped onto it, place the pad on the floor where the pedal will meet it.
Securely clamp the kick pedal to the base of the kick pad, ensuring the pad remains stable when struck.
If your kit has a kick tower (a larger pad resembling a bass drum), simply place it in the correct location in front of your pedal.
Ensure the tower doesn’t slide forward when struck; many have retractable spurs or Velcro underneath for stability.
Positioning the hi-hat pedal comfortably for your non-dominant foot is equally important for balanced playing. While sitting on the throne with your dominant foot on the kick pedal, allow your non-dominant foot (typically the left) to rest naturally on the floor where the hi-hat pedal will go.
Place the hi-hat pedal here.
This position should allow you to easily operate the pedal to create open and closed hi-hat sounds without awkward stretching or twisting of your leg or torso.
The distance between the kick and hi-hat pedals should feel natural and allow for smooth transitions between them.
Mounting the Pads: Snare, Toms, and Cymbals
Attaching the drum and cymbal pads to the rack constitutes the next phase of your electronic drum set setup, giving your kit its physical layout.
You should begin by mounting the snare pad directly in front of your sitting position, between your legs. The snare pad is typically the central piece of the kit around which other pads are positioned.
Secure it to a dedicated snare stand or an arm attached to the rack.
Adjust the height and angle so you can comfortably strike the center and rim (if applicable) without raising your arms too high or hunching over.
The angle should be slightly tilted towards you for ease of playing.
Attaching the tom pads to the horizontal bars of the rack in a comfortable arc follows the snare placement. Most kits include mounts that clamp onto the rack bars and hold the tom pads using L-rods or similar fittings.
Arrange the tom pads (commonly Tom 1, Tom 2, and potentially a floor tom) in an arc that mirrors the natural reach of your arms from the snare position.
Adjust the height and angle of each tom pad individually, ensuring you can strike the playing surface cleanly and transition between toms smoothly.
Avoid placing them too high or too far apart, as this leads to strained movement.
Mounting the cymbal pads on their respective arms or stands completes the physical arrangement of the playing surfaces. The hi-hat cymbal pad typically sits above the hi-hat pedal, mounted on an arm attached to the rack.
Position it so you can easily strike it with your stick while operating the pedal with your foot.
The crash and ride cymbal pads should be mounted on their own arms, usually higher and further out than the tom pads, mimicking the position of acoustic cymbals.
Adjust their height and angle for comfortable striking, allowing for crashes and riding patterns without awkward reach.
Ensure cymbal pads are positioned so they don’t interfere with striking the drum pads.
Here is a list of common pad types and their typical placement:
- Snare Pad: Center, between legs, primary pad.
- Tom Pads (Tom 1, Tom 2): Mounted on the rack, typically in an arc above or to the sides of the snare.
- Floor Tom Pad: Mounted on the rack or a separate stand, usually to the right of the seated player.
- Hi-Hat Pad: Mounted above the hi-hat pedal.
- Crash Cymbal Pad: Mounted on the rack, typically to the left of the snare/toms (for right-handed players).
- Ride Cymbal Pad: Mounted on the rack, typically to the right of the toms, often larger than crash pads.
- Kick Pad/Tower: Placed on the floor in front of the kick pedal.
The Brains of the Operation: Mounting the Drum Module
The drum module, often referred to as the “brain” of your electronic drum set, processes the signals from the pads and pedals and produces the sounds.
Mounting the drum module in an easily accessible location on the rack is crucial for convenient operation and adjustment. Most kits include a dedicated mount designed to attach the module securely to one of the rack’s vertical or horizontal bars.
Choosing the ideal position for the module prioritizes visibility and ease of access during playing. Many drummers prefer to mount the module on the left side of the rack, near the hi-hat, as this keeps it within easy reach for making quick changes to kits, volume, or tempo without interrupting their playing flow significantly.
The module’s screen should be clearly visible from your seated position, allowing you to navigate menus and see settings at a glance.
Securing the module firmly using the provided mount prevents movement or accidental detachment during playing. Attach the module mount to the chosen rack bar and tighten the clamp securely.
Then, attach the module to the mount, ensuring it is locked into place according to the manufacturer’s instructions.
A securely mounted module remains stable, which is important for reliable cable connections and preventing damage.
Avoid mounting it in a position where it might be hit by a drumstick during enthusiastic playing.
Making the Connections: Wiring Everything Up
Connecting the pads and pedals to the drum module is where your electronic drum set comes to life, enabling the physical strikes to trigger sounds.
Referring to your drum module’s manual for the correct input ports is the absolutely essential first step in the wiring process. Each pad and pedal must be connected to a specific port on the back or side of the module.
These ports are typically labeled with the name of the drum or cymbal (e.g., “Snare,” “Kick,” “Hi-Hat Pedal,” “Crash”).
Connecting each pad and pedal to its corresponding input on the drum module using the included cables follows the identification of ports. Most electronic drum kits come with a set of cables, often bundled together and sometimes color-coded or labeled at each end.
Take one cable at a time and connect one end to the output jack on the pad or pedal and the other end to the correctly labeled input port on the drum module.
Ensure the connectors are fully inserted into the jacks to establish a reliable connection.
Paying close attention to specific connection types is important, especially for multi-zone pads or hi-hat controllers. Some pads, particularly snares and rides on more advanced kits, are “multi-zone,” meaning they can produce different sounds depending on where you strike them (e.g., head, rim, bell).
These often require stereo cables (TRS cables) to transmit the multiple trigger signals to the module.
Similarly, continuous hi-hat controllers require specific connections to transmit information about the pedal’s position (open, closed, in-between) to the module.
Consult your manual to confirm which cables go to which inputs for full functionality.
Routing the cables neatly is not just for aesthetics; it significantly improves the safety and usability of your setup. Once all components are connected, gather the cables and use cable ties, Velcro straps, or cable sleeves to bundle them together and secure them along the frame of the drum rack.
This prevents cables from dangling, becoming tangled, or being accidentally snagged or tripped over.
Proper electronic drum cable management minimizes wear and tear on the cables and connectors and gives your kit a professional appearance.
Here is a simple table illustrating common connections:
| Component | Connects From | Connects To | Cable Type (Typical) | Notes |
|---|---|---|---|---|
| Drum Pad (Mono) | Pad Output Jack | Module Input Port | Mono (TS) Instrument Cable | For basic pads (single sound/zone). |
| Drum Pad (Multi-zone) | Pad Output Jack(s) | Module Input Port(s) | Stereo (TRS) Instrument Cable | For pads with rim/head distinction, etc. |
| Kick Pad/Tower | Pad Output Jack | Module “Kick” Input | Mono (TS) Instrument Cable | Connects the pad struck by the pedal. |
| Kick Pedal Trigger | Pedal Output Jack | Module “Kick” Input | Mono (TS) Instrument Cable | For pedals with integrated triggers. |
| Hi-Hat Pedal | Pedal Output Jack | Module “Hi-Hat Cntrl” | Stereo (TRS) or Specific | Transmits pedal position data. |
| Cymbal Pad (Mono) | Pad Output Jack | Module Input Port | Mono (TS) Instrument Cable | For basic crash or ride (single sound). |
| Cymbal Pad (Multi-zone) | Pad Output Jack(s) | Module Input Port(s) | Stereo (TRS) or Specific | For bow/edge/bell sounds. |
Powering On and Initial Configuration
Bringing your electronic drum set to life requires connecting it to power and performing some initial checks on the module.
Connecting the power adapter to the drum module and a suitable power outlet provides the necessary electricity for the module to operate. Locate the power input jack on your drum module and the included power adapter.
Plug the adapter into the module and then into a wall outlet.
Use a surge protector if possible to safeguard your equipment from power fluctuations.
Connecting headphones or a drum amplifier to the module’s audio output allows you to hear the sounds your kit produces. Electronic drums produce no acoustic sound from the pads themselves; the sound is generated by the module.
Locate the headphone jack (usually a 1/4-inch or 1/8-inch stereo jack) or the main audio output jacks (typically 1/4-inch mono or stereo) on the module.
Plug in your headphones or connect the module to a dedicated electronic drum amplifier or your audio interface/PA system.
Start with the volume low and gradually increase it.
Powering on the module activates the electronic components and loads the operating system and sounds. Locate the power button, usually on the front or back of the module, and switch it on.
The module display should light up, indicating it is booting up.
Allow it a few moments to fully initialize before attempting to play.
Familiarizing yourself with basic module navigation is crucial for selecting drum kits and adjusting fundamental settings. Most modules have a display screen and buttons or knobs for navigation.
Spend some time pressing buttons, rotating dials, and exploring the menus.
Learn how to select different drum kits (presets of sounds assigned to each pad), adjust the overall volume (master volume), and potentially find the metronome function, which is invaluable for practice.
Consult your manual for detailed instructions on navigating your specific module’s interface.
This initial exploration is a key part of the electronic drum module setup.
Ergonomics and Fine-Tuning Your Setup
Optimal electronic drum setup extends beyond simply assembling the components; it involves adjusting the physical layout for your individual body and playing style, a practice known as ergonomics.
Sitting at your assembled kit and checking your posture serves as the starting point for ergonomic adjustments. Sit on your drum throne as you would when playing, with your feet resting naturally on the pedals.
Your back should be relatively straight, and your shoulders relaxed.
Avoid slouching or tensing up.
Ensuring all pads and pedals are comfortably within reach without stretching or straining is the primary goal of ergonomic fine-tuning. With your sticks in hand, reach out to each pad and pedal you would typically use during a song.
You should be able to strike the center of each pad and operate each pedal fluidly and comfortably without having to significantly alter your posture or overextend your limbs.
This might require minor adjustments to the position, height, or angle of pads and cymbal arms on the rack.
Adjusting pad heights, angles, and positions as needed allows you to create a personalized and natural playing feel. Loosen the clamps holding the pads and cymbal arms and move them slightly.
Tweak the angle of the pads so the playing surface is easy to strike squarely.
The snare height should allow your forearms to be roughly parallel to the floor when striking the center.
Toms should follow a natural arc.
Cymbals should be positioned so crashes are easily accessible and the ride cymbal allows for comfortable playing on the bow and bell.
These small adjustments have a significant impact on your comfort and playing endurance.
Experimenting with different setups allows you to discover what feels most natural and comfortable for your unique body proportions and playing style. Don’t be afraid to spend time making incremental changes and trying them out.
What works for one drummer may not work for another.
Pay attention to how your body feels after playing for a while; any discomfort or tension indicates a potential ergonomic issue that needs addressing.
Investing time in ergonomic setup is crucial for developing good technique and preventing injuries.
Here is a list of ergonomic checkpoints:
- Drum Throne Height: Thighs parallel or slightly angled down, feet flat on the floor.
- Snare Position: Centered between legs, height allows forearms parallel to floor, slightly angled towards you.
- Tom Positions: Arranged in a comfortable arc, easily reachable from the snare, heights and angles allow for clean strikes.
- Cymbal Positions: Within easy reach for crashes and riding, heights allow for comfortable striking without overextending.
- Pedal Positions: Allow for relaxed ankle movement and comfortable operation of kick and hi-hat.
- Module Position: Visible and easily accessible for quick adjustments.
- Overall Reach: Can you comfortably reach all playing surfaces without straining or changing posture significantly?
Connecting to External Devices (Optional)
Your electronic drum set can be connected to various external devices to expand its functionality for practice, performance, or recording.
Connecting your module to a computer via USB or MIDI opens up possibilities for recording, using drum software, or interactive learning. Many modern modules have a USB-MIDI port that allows them to send MIDI data (information about which pad was hit, how hard, etc.) to a computer.
You can use this data to trigger drum sounds in a Digital Audio Workstation (DAW) like GarageBand, Ableton Live, or Pro Tools, or dedicated drum VST (Virtual Studio Technology) instruments like Superior Drummer or EZdrummer, which often offer higher fidelity sounds than the module itself.
MIDI cables (5-pin DIN connectors) are also an option if your module and computer interface have MIDI in/out ports.
Ensure you install any necessary drivers for your drum module on your computer.
Connecting an external music player to the module’s Aux In port allows you to play along to your favorite songs. Most modules feature a stereo auxiliary input (often a 1/8-inch or 1/4-inch jack) labeled “Aux In” or “Mix In.” Use a standard audio cable to connect the headphone output of your phone, tablet, or MP3 player to this input.
The audio from your external device will then be mixed with the drum sounds from your module, and you will hear both through your headphones or connected speakers.
This is an excellent feature for practicing with backing tracks or learning songs.
Connecting your module to speakers or a PA system enables you to play your electronic drum set audibly for others to hear, suitable for rehearsals or live performance. Use the main audio output jacks on your module (typically 1/4-inch Left and Right outputs).
Connect these to the inputs of a dedicated electronic drum amplifier (recommended, as they are designed to reproduce the full frequency range, including the low end of the kick drum), a keyboard amplifier, an audio interface connected to studio monitors, or a PA system mixer.
Avoid using a standard guitar amplifier, as they do not reproduce the necessary bass frequencies accurately.
Here is a table outlining common external connection types:
| Connection Type | Purpose | Module Port(s) Used | Cable Type(s) | Notes |
|---|---|---|---|---|
| USB-MIDI | Send/Receive MIDI data with computer. | USB-MIDI Port | Standard USB Cable (Type A to B or Type C) | Requires driver installation on computer. |
| MIDI In/Out | Send/Receive MIDI data with other MIDI gear. | MIDI OUT, MIDI IN Ports | 5-pin DIN MIDI Cable | For connecting to older interfaces or other MIDI instruments. |
| Aux In / Mix In | Play along with external audio. | AUX IN / MIX IN Jack | 1/8″ or 1/4″ Stereo Audio Cable | Connects phone, tablet, MP3 player, etc. |
| Main Audio Output | Send module audio to headphones/speakers/PA. | Headphones Jack, MAIN OUT L/R Jacks | 1/4″ Stereo (Headphones), 1/4″ Mono or Stereo | Connects to headphones, amp, interface, mixer. |
Cable Management: Keeping it Tidy and Safe
Effective electronic drum cable management transforms a potentially messy and hazardous setup into a clean, organized, and safer playing environment.
Reviewing your current cable routing provides an overview of how the cables are positioned and identifies areas for improvement. Once all components are connected and working, take a step back and look at the cables running between the pads, pedals, and module.
Are they loose and hanging? Are they crossing in pathways where you or others might trip? Are they strained or bent sharply at connection points?
Using cable ties, sleeves, or Velcro straps to bundle and secure cables along the drum rack frame is the most effective way to achieve neat organization. Gather the cables running from a specific area (e.g., the tom pads) and use a cable tie or Velcro strap to bundle them together.
Then, attach these bundled cables to the nearest rack tube, following the lines of the rack.
Repeat this process for all cables, including those from the kick and hi-hat pedals.
Cable sleeves can be used to wrap multiple cables together for an even cleaner look.
Avoid tightening cable ties too much, as this can damage the cables.
Ensuring cables are not underfoot or in a position to be accidentally pulled minimizes tripping hazards and protects your equipment. Route cables away from where you sit, stand, or walk around the kit.
Keep pedal cables close to the floor and secured so they don’t become entangled with your feet.
Ensure cables connected to the module have some slack so accidental tugs on the cable don’t pull on the module itself.
Proper electronic drum cable management delivers significant benefits, including improved aesthetics, reduced wear and tear on cables and connectors, and enhanced safety. A tidy setup looks more professional and inviting.
Cables that are neatly routed and secured are less likely to be stepped on, bent, or pulled, extending their lifespan and preventing costly replacements.
Most importantly, eliminating loose cables reduces the risk of trips and falls, making your playing area safer for you and anyone else around it.
This attention to detail is a hallmark of a well-maintained electronic drum set setup.
Here is a list of cable management tips:
- Use Velcro straps for easy adjustment and reuse.
- Bundle cables logically based on their origin or destination.
- Follow the lines of the drum rack when routing cables.
- Leave a small amount of slack at connection points to prevent strain.
- Check cable routing periodically, as movement during playing can sometimes loosen ties.
- Consider using colored cable ties or labels to identify specific cables if needed.
- Ensure power cables are routed separately from audio cables to avoid interference.
Troubleshooting Common Setup Issues
Even with careful assembly, you might encounter minor issues during your initial electronic drum setup.
Knowing how to troubleshoot common problems saves time and frustration.
- No sound from a specific pad: Check the cable connection at both the pad and the module.Ensure the cable is fully inserted and connected to the correct input port on the module.
Check the pad’s settings in the module to ensure it’s assigned a sound and its volume isn’t turned down.
Swap the cable with a known working cable to rule out a faulty cable.
- Inconsistent triggering: Ensure the pad is securely mounted and not wobbling.Check the sensitivity and threshold settings for that pad in the module.
Adjusting these can help prevent false triggers or missed hits.
Ensure you are striking the correct playing surface (head, rim) for the desired sound.
- Hi-hat pedal not working correctly: Verify the pedal is connected to the designated hi-hat control input on the module.Check the hi-hat type setting in the module to ensure it matches your pedal (e.g., continuous, switch).
Some modules require calibration for the hi-hat pedal; consult your manual for instructions.
- No sound from headphones/speakers: Check the connection to the audio output port(s) on the module.Ensure the headphones or amplifier are powered on and the volume is turned up (both on the module and the external device).
Try connecting a different audio source to the headphones/amplifier to ensure they are working correctly.
- Module not powering on: Ensure the power adapter is securely connected to the module and the wall outlet.Try a different power outlet.
If the adapter has an indicator light, check if it is on.
Ensure the power switch on the module is in the “on” position.
Setting up your electronic drum set correctly is a foundational step towards enjoying your instrument to its fullest.
By carefully following the steps outlined in this guide, from unpacking and assembling the rack to connecting cables and fine-tuning ergonomics, you establish a solid foundation for comfortable and expressive drumming.
Proper electronic drum setup not only ensures reliable performance and protects your investment but also significantly impacts your ability to learn and grow as a drummer.
Take your time, consult your manual often, and don’t hesitate to make adjustments until the kit feels perfectly tailored to you.
With your electronic drum kit assembly complete and your electronic drum module setup configured, you are now ready to explore the vast sonic possibilities and embark on a rewarding musical journey with one of the best electronic drum sets for your needs.
Enjoy playing!