Achieving the correct drum throne height is arguably the most critical ergonomic adjustment a drummer can make, as it directly dictates posture, balance, power, and endurance, forming the very foundation of effective and injury-free playing.
Many drummers, both novice and experienced, grapple with issues like back pain, inconsistent pedal technique, or a general feeling of being unbalanced, often without realizing the root cause lies in an improperly adjusted seat.
The search for a definitive “drum throne height chart” is a common quest, born from a desire for a simple, one-size-fits-all solution.
This article will demystify the process of setting your drum throne height, explaining why a universal chart is a myth and how to discover your own ideal setting.
We will delve into the biomechanics of drumming posture, explore the concept of the ergonomic “Goldilocks Zone,” and provide a detailed, step-by-step guide to creating your own personalized height measurement.
Furthermore, we will examine how different playing styles influence your setup, break down the various types of thrones and their height adjustment ranges, and highlight common mistakes to avoid, ensuring you have all the knowledge necessary to build a comfortable, powerful, and sustainable foundation for your drumming.
Why Your Drum Throne Height is the Foundation of Your Playing
The height of your drum throne is the cornerstone of your entire physical interaction with the drum set, profoundly influencing every aspect of your performance from comfort to technical execution.
An optimal throne height establishes a neutral and stable pelvic position, which is the epicenter of your body’s balance and the starting point for all limb movements.
When your pelvis is correctly aligned, it allows your spine to maintain its natural curves, preventing the slouching that leads to chronic lower back pain and fatigue.
This foundational stability is not merely about avoiding discomfort; it is about creating a platform from which your limbs can operate with maximum efficiency and freedom.
From this balanced core, you can generate more power with less effort, execute intricate patterns with greater precision, and maintain your energy for longer periods.
Proper throne height directly impacts your posture and is your first line of defense against long-term playing-related injuries.
When you sit too low, your pelvis tilts backward, forcing your lumbar spine to round into a “C” shape, a position that places significant stress on the intervertebral discs and surrounding muscles, leading to chronic pain and potential injury.
Conversely, sitting too high can cause you to hyperextend your lower back and shift excessive weight onto your “sit bones,” creating pressure points and instability.
By finding the correct height where your hips are slightly above your knees, you encourage a neutral pelvic tilt and a healthy spinal alignment, distributing your weight evenly and minimizing strain on your musculoskeletal system, safeguarding your body for a lifetime of playing.
Your balance and stability behind the kit are inextricably linked to the height of your seat.
The drum throne acts as the third point of a tripod, with your two feet on the pedals forming the other two points, creating your base of support.
If this central anchor is positioned incorrectly, the entire structure becomes compromised.
A throne set too high can make you feel precarious and disconnected from the ground, as if you’re floating above the kit, which forces your core muscles to work overtime just to maintain balance, detracting from the energy available for playing.
A throne that is too low collapses your core, making it difficult to shift your weight effectively for powerful strokes or quick movements around the kit, leaving you feeling sluggish and rooted to the spot.
The right height provides a solid, grounded connection, allowing for fluid, controlled movement and unwavering stability, no matter how complex or dynamic your playing becomes.
The effectiveness of your pedal technique is critically dependent on the biomechanical advantages afforded by a correctly adjusted drum throne.
The angle of your thighs, determined by your seat height, dictates the leverage and range of motion available at your hips, knees, and ankles.
With an optimal downward slope of the thigh, gravity assists in the downward motion of your foot, allowing for a more relaxed and powerful pedal stroke with less muscular effort.
This efficient transfer of energy is key to developing speed, control, and nuance in both your bass drum and hi-hat playing.
If you sit too low, your hip flexors are forced to work harder to lift your entire leg for each stroke, leading to rapid fatigue and a heavy, unresponsive feel from the pedals.
This ergonomic advantage is the secret behind the seemingly effortless and explosive footwork of many professional drummers.
Ultimately, a well-adjusted drum throne significantly enhances your overall comfort and endurance, allowing you to play for extended periods without pain or fatigue.
When your body is in a state of ergonomic equilibrium, your muscles are not fighting against a poor setup; instead, they are free to focus on the task of making music.
This reduction in unnecessary muscular strain means you conserve energy, delaying the onset of fatigue during long gigs, rehearsals, or practice sessions.
This sustained comfort not only makes drumming more enjoyable but also allows for deeper focus and creativity, as you are not distracted by physical discomfort.
Investing the time to find your perfect drum throne height is a direct investment in your longevity and enjoyment as a drummer.
The Myth of a “Standard Drum Throne Height”
There is no single, universally accepted “standard drum throne height” because the ideal measurement is entirely dependent on an individual’s unique physical proportions.
The concept of a standard height fails to account for the vast differences in human anatomy, such as a drummer’s overall height, inseam length (the distance from the crotch to the floor), and the relative lengths of their upper and lower leg segments.
Two drummers of the same height might have vastly different leg lengths, meaning a “standard” height that works for one could be ergonomically disastrous for the other.
Therefore, the pursuit of a specific number is misguided; the focus should instead be on achieving a set of ergonomic principles that result in a personalized, optimal playing position.
Relying on a generic or “standard” measurement for your drum throne can be detrimental to your playing and your physical health.
Adopting a height that is not suited to your body forces you into an unnatural posture, which can lead to a cascade of negative consequences.
For example, if a “standard” height is too low for a tall drummer, it will cause their knees to be higher than their hips, leading to the aforementioned lower back strain and inhibited pedal technique.
Conversely, if that same height is too high for a shorter drummer, they may struggle to reach the pedals properly, leading to instability and a lack of power.
The “one-size-fits-all” approach simply does not apply to ergonomics, and attempting to conform to an arbitrary standard can ingrain bad habits and increase the risk of injury over time.
The goal for every drummer should be to transition away from seeking a specific measurement and toward understanding the principles of a personalized ergonomic position.
This involves learning to listen to your body and recognizing the feeling of a balanced, stable, and comfortable setup.
It’s about achieving the correct relationship between your hips and knees, ensuring a slight downward angle of your thighs, and feeling a solid connection to both your throne and your pedals.
Once you understand these fundamental principles, you can apply them to any drum kit in any situation, confident that you can replicate your optimal playing position without needing a tape measure or a “drum throne height chart.” This knowledge empowers you to take control of your own comfort and performance.
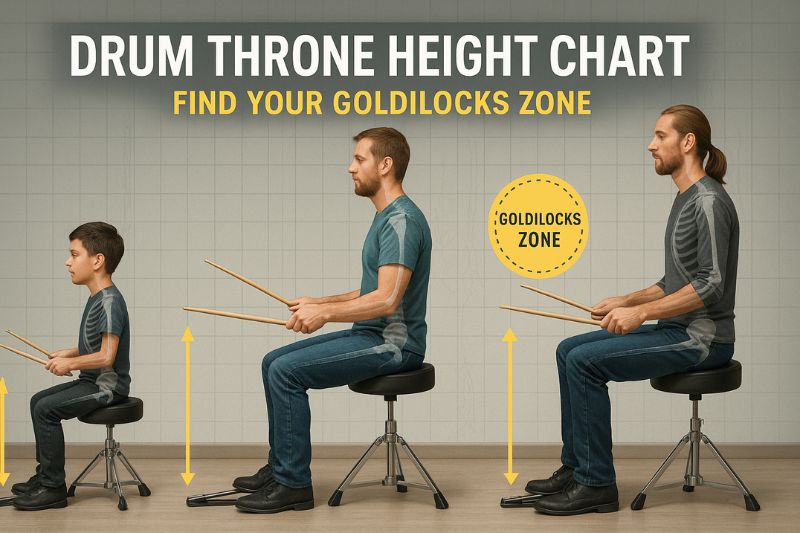
The “Goldilocks Zone”: Finding Your Ideal Drum Throne Seat Height
The core principle behind finding your perfect throne height is to locate your personal “Goldilocks Zone,” a position that is not too high and not too low, but biomechanically “just right” for your body.
This zone is less about a precise measurement and more about achieving a state of ergonomic harmony where you feel balanced, powerful, and completely comfortable.
In this optimal position, your body works with you, not against you.
Movement feels effortless, your connection to the pedals is direct and responsive, and your posture is naturally supported, allowing you to play for hours without undue strain or fatigue.
The “Goldilocks Zone” is the sweet spot where physics and anatomy align to unlock your full potential behind the kit.
The most crucial ergonomic rule for establishing your “Goldilocks Zone” is to ensure your hips are positioned slightly higher than your knees when your feet are on the pedals.
This creates a gentle, downward slope for your thighs, which is the cornerstone of proper drumming posture.
This specific alignment allows your pelvis to maintain a neutral tilt, which in turn supports the natural S-curve of your spine, preventing the harmful rounding of the lower back.
Aiming for a knee angle between 90 and 110 degrees is a reliable guideline; a 90-degree angle (thighs parallel to the floor) is the absolute minimum, with a slightly more open angle often providing greater comfort and leverage for pedal work.
A fantastic starting point for discovering your “Goldilocks Zone” is the simple yet effective “Rule of Knee”.
To use this method, stand next to your drum throne and adjust the height of the seat so that the very top of the cushion is level with or just slightly above the top of your kneecap.
For most individuals, this will provide a very close initial estimate for the average drum throne height that suits their body.
While this is not the final step, it quickly gets you into the correct ballpark, providing a solid baseline from which you can begin the fine-tuning process to pinpoint the exact height that feels perfect for you.
Here is a table summarizing the key ergonomic checkpoints for the “Goldilocks Zone”:
| Ergonomic Checkpoint | Ideal Position | Why It Matters |
|---|---|---|
| Hip-to-Knee Relationship | Hips are slightly higher than knees. | Promotes a neutral pelvic tilt, protecting the lower back. |
| Thigh Angle | A gentle downward slope from hip to knee. | Utilizes gravity for pedal strokes, increasing power and efficiency. |
| Knee Angle | Approximately 90-110 degrees. | Provides optimal leverage and range of motion for footwork. |
| Spinal Posture | Maintains the natural ‘S’ curve. | Distributes weight evenly and prevents muscle strain and injury. |
| Balance | Feeling stable and grounded on the throne. | Creates a solid foundation for all limb movements. |
Your Personalized Drum Throne Height “Chart” (A Step-by-Step Guide)
This section will guide you through creating your own personalized “drum throne height chart,” which is essentially the single, optimal measurement for your body that you can replicate on any kit.
Step 1: The Initial Setup (The “Rule of Knee”)
Begin the process by applying the “Rule of Knee” to establish a solid baseline for your drum throne seat height.
Stand upright next to your throne, wearing the shoes you typically drum in, as footwear can slightly alter your height.
Adjust the throne’s seat until the highest point of the cushion is just above your kneecap.
This initial setting is a crucial first approximation that will place you very near your ideal playing position and serves as the starting point for the subsequent fine-tuning steps.
Step 2: Sit and Position Your Feet
Now, sit down on the throne, positioning yourself so that you are not perched on the very edge, nor sitting so far back that the seat restricts the movement of your upper legs.
Place your feet comfortably on your bass drum and hi-hat pedals, finding the “sweet spot” on the footboards where you feel you have the most control.
Allow your legs to relax in this position; this is your neutral playing stance and the posture from which all further adjustments will be evaluated.
Step 3: Check the Angle
From your seated position, glance down at your thighs or have a friend observe you from the side to check the angle of your upper legs.
The primary goal is to confirm that your hips are indeed slightly higher than your knees, resulting in that gentle downward slope.
If your thighs are parallel to the floor or, even worse, angled upwards with your knees above your hips, your throne is too low.
If the downward angle is excessively steep and you feel like you’re sliding forward, it may be too high.
This visual check is a critical confirmation that you are on the right ergonomic track.
Step 4: Fine-Tune and Adjust
This is where you dial in the perfect height with micro-adjustments.
If the initial check revealed the throne was too low, raise it by a very small increment—half an inch or even less.
If it felt too high, lower it slightly.
After each minute adjustment, sit back down, reposition your feet, and re-evaluate the feeling and the angle.
The goal is to make subtle changes until you arrive at a position that feels completely natural, balanced, and free of any tension in your hips or lower back.
Be patient during this phase; the small differences can have a significant impact on your overall comfort and performance.
Step 5: Play and Evaluate
Once you’ve found a height that feels promising, the next step is to put it to the test by playing.
Spend at least five to ten minutes playing a variety of patterns that involve both your hands and feet.
Pay close attention to how your body feels.
Do you feel powerful and connected to the pedals? Are you able to move around the kit freely without feeling unstable? Is there any emerging strain in your back, hips, or knees? This practical evaluation is the ultimate arbiter, as a position that seems correct statically must also prove to be effective and comfortable during the dynamic act of playing.
Step 6: Measure and Record
After you have thoroughly evaluated the height and are confident that you have found your “Goldilocks Zone,” it’s time to create your permanent record.
Use a tape measure to determine the distance from the floor to the highest point of the seat cushion.
Write this measurement down and save it in your phone or with your gear.
This number is your personalized “drum throne height chart”.
Now, whenever you encounter a new drum kit, you can quickly and accurately set up the throne to your exact specification, ensuring consistent comfort and ergonomic correctness no matter where you play.
How Playing Style Affects Your Throne Height
Your preferred foot technique, primarily whether you play heel-up or heel-down, can significantly influence the optimal drum throne seat height for your setup.
For drummers who predominantly use the heel-up technique, where the heel is lifted off the pedal and the stroke is driven by the entire leg, a slightly higher throne position is often more advantageous.
This elevated position naturally facilitates lifting the heel and allows for a greater range of motion from the hip, which can translate into increased power and volume.
The steeper downward angle of the leg allows gravity to play a larger role in the pedal stroke, making this powerful technique feel more effortless and efficient.
Conversely, drummers who employ a heel-down technique, where the heel remains in contact with the heel plate of the pedal for quieter and more nuanced playing, may find a slightly lower throne height to be more comfortable and effective.
This lower position allows the entire foot to rest more naturally on the pedal, providing the stability and fine motor control necessary for the ankle-driven motions characteristic of this style.
If the throne is set too high, heel-down players may find it difficult to keep their heel anchored without creating tension in the shin muscles (tibialis anterior), which can lead to fatigue and a loss of control.
The key is to find a height that allows the ankle to pivot freely without strain.
It is important to recognize that many drummers utilize a hybrid approach, switching between heel-up and heel-down techniques depending on the desired dynamics and musical context.
For these players, finding the ideal throne height involves a slight compromise—a position that is not so high that it makes heel-down playing uncomfortable, yet not so low that it robs the heel-up technique of its power and efficiency.
This often leads back to the foundational “Goldilocks Zone” where the hips are just slightly above the knees, a versatile position that provides a solid ergonomic base from which to launch either technique effectively.
Experimentation is key to finding this versatile sweet spot.
Here is a list of considerations for how playing style might influence your height choice:
- Dynamic Range:
- If your playing requires frequent and rapid shifts between very loud (heel-up) and very soft (heel-down) passages, a moderate, versatile height is paramount.
- Genre:
- Jazz drummers who rely heavily on nuanced hi-hat work with the heel-down technique might prefer a slightly lower setup, whereas rock and metal drummers who need maximum power for fast double bass patterns will almost certainly favor a higher position for heel-up playing.
- Ankle vs. Leg Motion:
- Consider whether your playing is driven more by large leg motions or fine ankle motions.
- A higher throne facilitates the former, while a slightly lower throne can provide more stability for the latter.
- Endurance:
- The most important factor is finding a height that allows you to execute your preferred techniques for extended periods without pain or fatigue.
- Your body’s feedback should be the ultimate guide.
Understanding Drum Throne Height Range and Types
The adjustable drum throne height range is a critical specification to consider when purchasing a throne, as it determines whether the seat can accommodate your personal ergonomic needs.
Most standard drum thrones offer a height adjustment range of approximately 18 to 25 inches (46 to 63 cm), which is suitable for a wide variety of players.
However, this is not universal, and ranges can vary significantly between brands and models.
For example, some “low-profile” thrones are designed for players who prefer a lower setup, while “extended height” models cater to exceptionally tall drummers or those who favor a very high playing position.
It is crucial to check the manufacturer’s specifications for the minimum and maximum height before making a purchase to ensure it aligns with your measured “Goldilocks” height.
The mechanism for height adjustment is another key feature that distinguishes different types of drum thrones, impacting both stability and ease of use.
There are three primary types of adjustment systems:
- Spindle (Threaded Post):
- This is a highly secure and reliable system where the seat is raised or lowered by spinning it on a threaded steel rod.
- Once set, a locking nut secures the position, making it virtually impossible for the height to slip during play.
- This offers rock-solid stability, making it a favorite among many professionals.
- The main drawback is that adjustments are slower and less convenient than other systems.
- Hydraulic/Pneumatic:
- Similar to an office chair, these thrones use a gas-lift mechanism that allows for quick, smooth, and effortless height adjustments with the pull of a lever.
- This is incredibly convenient for drummers who share a kit or who like to make frequent micro-adjustments.
- While modern hydraulic thrones are very stable, some players feel they lack the absolute solidity of a spindle lock.
- Notched/Pinned (Telescoping):
- This system uses a tube that slides into a larger base tube and is secured by a bolt that passes through a series of pre-drilled holes or is clamped onto the inner tube.
- While often found on more budget-friendly models, this system is the least precise, as your height choices are limited to the fixed increments of the holes.
- A memory lock can help secure the position, but it lacks the fine-tuning capability of spindle or hydraulic systems.
The choice of throne type often comes down to a balance of budget, convenience, and the need for absolute stability.
Here is a table comparing the different throne adjustment types:
| Adjustment Type | Pros | Cons | Best For |
|---|---|---|---|
| Spindle (Threaded Post) | Extremely stable and secure; infinite fine-tuning. | Slower to adjust. | Drummers who “set it and forget it”; studio use. |
| Hydraulic/Pneumatic | Fast, easy, and smooth adjustments. | Can be more expensive; may have a slight “bounce.” | Shared kits; teaching studios; players who adjust often. |
| Notched/Pinned | Typically the most affordable option. | Limited, incremental adjustments; less precise. | Beginners; budget-conscious players. |
Common Mistakes to Avoid
One of the most frequent and detrimental mistakes drummers make is setting their throne too low.
When the seat is too low, the knees rise above the hips, causing the pelvis to tilt backward and the lumbar spine to curve into a slouched position, which places immense strain on the lower back.
This poor posture not only leads to chronic pain but also severely hampers pedal technique, resulting in a sluggish and heavy feel from the bass drum and hi-hat.
You are forced to lift your entire thigh for every stroke, a highly inefficient movement that leads to rapid fatigue in the hip flexor muscles and a lack of power and speed.
If you consistently experience lower back pain after playing or feel like you’re fighting your pedals, it’s highly probable that your throne is set too low.
While less common, setting a drum throne too high can also lead to a host of problems.
An excessively high seat position can create a sensation of instability, as if you are perched precariously on top of the kit rather than being a grounded part of it.
This forces you to stretch to reach the pedals, which can strain the hamstrings and calf muscles and lead to a disconnected, floating feeling where you lack the leverage to put the weight of your leg into the stroke.
This results in a significant loss of power and a thin, weak bass drum sound.
Furthermore, this unstable position can cause you to tense your core and leg muscles simply to maintain balance, leading to unnecessary fatigue and a lack of fluidity in your playing.
Here is a list of symptoms that can help you diagnose if your throne height is incorrect:
- Symptoms of a Throne That’s Too Low:
- Chronic lower back pain or stiffness after playing.
- Knees are noticeably higher than hips when seated.
- A feeling of being “stuck” or having limited mobility.
- Pedals feel heavy, sluggish, and unresponsive.
- Rapid fatigue in the front of your thighs (quadriceps and hip flexors).
- Difficulty generating power and volume from the bass drum.
- Symptoms of a Throne That’s Too High:
- Feeling unstable, unbalanced, or like you might slide forward.
- Having to point your toes downward to reach the pedals.
- Tension or strain in your shins, calves, or hamstrings.
- A weak or thin bass drum sound due to lack of leverage.
- Difficulty playing with control and nuance.
- Your non-pedal leg feels like it’s dangling uncomfortably.
Frequently Asked Questions (FAQ)
What is the average drum throne height?
While there is no official “average drum throne height” that fits everyone, most drummers find their ideal position falls within a range of 18 to 25 inches.
The most effective way to find the right average height for your own body is to use the “Rule of Knee” as a starting point—adjusting the seat to be just above your kneecap when standing—and then fine-tuning from there until your hips are slightly higher than your knees when playing.
Can my drum throne be too high?
Yes, your drum throne can absolutely be too high, which can lead to a lack of power, a feeling of instability, and strain on your leg muscles as you stretch to reach the pedals.
If you feel like you’re floating above the kit and can’t get the full weight of your leg into the pedal stroke, your throne is likely too high.
How do I know if my drum throne is too low?
The most common signs of a drum throne that is too low are chronic lower back pain, knees being positioned higher than your hips, and a sluggish, heavy response from your pedals.
This position forces you to work against gravity and can lead to rapid fatigue in your thighs and a significant loss of power and speed in your footwork.
Should my feet be flat on the pedals?
Whether your feet are flat on the pedals depends entirely on your playing technique.
For heel-down playing, your foot will be relatively flat with your heel resting on the pedal’s heel plate.
For the more common heel-up technique, only the ball of your foot will be in contact with the footboard, with your heel elevated, allowing for more power and speed.
Your throne height should be set to comfortably accommodate your preferred technique or a combination of both.
Conclusion
The quest for the perfect drum throne height chart ultimately leads to the discovery that the most important measurements are your own.
The perfect drum throne height is a deeply personal setting, a unique number derived from your body’s specific anatomy and guided by the universal principles of ergonomics.
It is not a number you find in a manual, but one you discover through a process of careful adjustment and attentive listening to your body’s feedback.
By abandoning the myth of a “one-size-fits-all” standard and embracing a personalized approach, you empower yourself to build a foundation of comfort, stability, and power that will support every aspect of your playing.
The single most important concept to take away from this guide is the “Goldilocks Zone” principle: your hips must be positioned slightly higher than your knees.
This simple yet profound alignment is the key that unlocks a neutral posture, protects your spine from long-term injury, and allows your limbs to operate with maximum efficiency and power.
It is the ergonomic cornerstone upon which all advanced drumming techniques are built.
We strongly encourage you to use the step-by-step guide provided in this article to find your own ideal drum throne seat height.
Take the time to experiment, make those small, incremental adjustments, and pay close attention to how your body feels.
Once you have located your sweet spot, measure it and make it your own personal standard.
This small investment of time will pay massive dividends in your comfort, endurance, and technical ability, allowing you to focus on what truly matters: making music.