The proper drum throne height is arguably the most critical yet frequently overlooked aspect of a drummer’s setup, serving as the ergonomic foundation for performance, health, and technique.
Achieving the correct drum throne height is not merely about comfort; it is the central pivot point that dictates your posture, balance, and the efficiency of every limb, directly influencing your power, speed, and endurance behind the kit while safeguarding your body against long-term injury.
This comprehensive guide will delve into every facet of this crucial topic, starting with why the ideal drum throne height is non-negotiable for any serious percussionist.
We will then explore several foolproof methods for discovering your personal optimal drum throne height, examine common mistakes and how to rectify them, and provide a detailed look at how this single adjustment impacts your entire interaction with the drum set.
By the end of this article, you will have a clear, actionable understanding of how to set your throne for peak performance and physical well-being.
Why the Correct Drum Throne Height is Non-Negotiable
The proper height of a drum throne is the cornerstone of effective and safe drumming, directly influencing your physical alignment, technical execution, and risk of injury.
From this foundational position, every movement originates; an incorrect height forces the body into a state of compensation, where muscles work inefficiently, joints are unduly stressed, and your potential as a player is fundamentally capped.
Drummers who neglect to establish the proper throne height for drumming often find themselves battling mysterious aches, technical plateaus, and a persistent feeling of being disconnected from their instrument.
Conversely, taking the time to establish the best drum throne height unlocks a new level of fluidity, power, and comfort, allowing you to focus purely on the music.
This section will meticulously break down the critical reasons why achieving the optimum drum throne height is an absolute necessity.
Ergonomics and Posture: Your Body’s Foundation
The correct drum throne height is the single most important factor in establishing proper drumming posture and maintaining spinal health.
When your throne is set correctly—typically with your hips positioned slightly above your knees—your pelvis can rest in a neutral position, which in turn allows your spine to maintain its natural S-curve.
This alignment is biomechanically efficient, distributing your upper body weight directly down through your sit bones and into the throne.
This minimizes the muscular effort required to simply sit upright, freeing up cognitive and physical resources for the complex task of drumming.
An incorrect height, particularly sitting too low, forces the pelvis to tilt backward, causing the lumbar spine to round into a “C” shape.
This posture places immense strain on the vertebral discs and the surrounding ligaments and muscles of the lower back, a leading cause of chronic pain among drummers.
Furthermore, the ideal drum throne height ensures that your core muscles can engage properly to stabilize your torso.
With a neutral spine, your core acts as a solid anchor, allowing your limbs to move independently and with maximum efficiency.
If you are slouched due to a low throne, your core cannot function optimally, leading to instability.
This instability often causes drummers to subconsciously use their limbs for balance, which detracts from their primary role of striking the drums and cymbals.
This compensatory tension can ripple throughout the body, leading to stiffness in the neck, shoulders, and hips.
Therefore, understanding what is the proper height for a drum throne is not just about comfort; it’s about creating an ergonomic base that supports your entire musculoskeletal system for hours of pain-free playing.
Performance and Technique: Unlocking Your Full Potential
The optimal drum throne height is directly correlated with your technical facility, balance, and power behind the drum set.
Proper height facilitates a state of relaxed equilibrium, where you are perfectly balanced on the throne, allowing your hands and feet to move with unrestricted freedom and precision.
When your hips are above your knees, gravity assists your leg movements rather than hindering them.
For heel-up pedal technique, this slight downward slope of the thighs allows the entire weight of the leg to be effortlessly transferred into the bass drum or hi-hat pedal, generating maximum power with minimal effort.
This efficiency is crucial for playing fast, intricate patterns and for maintaining endurance over long gigs or practice sessions.
Conversely, an improper height creates a cascade of technical limitations.
If you sit too low, you have to physically lift your entire leg with your hip flexors for every single pedal stroke, a fatiguing and inefficient motion that severely limits speed and power.
Your knees being higher than your hips essentially puts you in a position of fighting gravity.
If you sit too high, you may feel unstable and disconnected from the pedals, losing the grounded feeling necessary for solid timekeeping.
This can lead to “floating” feet and a lack of control.
The best drum throne height creates the perfect fulcrum for your body, enabling a seamless transfer of energy from your core, through your limbs, and into the instrument, resulting in a more powerful, controlled, and nuanced performance.
Injury Prevention: A Long-Term Investment in Your Health
Establishing the correct drum throne height is one of the most effective preventative measures you can take to ensure a long and healthy drumming career.
The repetitive motions involved in drumming can place significant stress on the body, and improper ergonomics dramatically amplify the risk of developing musculoskeletal injuries.
As mentioned, sitting too low is a primary culprit for chronic lower back pain, as it forces the lumbar spine into a constantly flexed and loaded position.
This can lead to serious conditions over time, such as disc herniation, sciatica, and degenerative disc disease.
The knees are another area highly susceptible to injury from an incorrect throne height.
When the throne is too low, the angle of the knee joint is too acute, placing excessive pressure on the patella (kneecap) and surrounding tendons.
This can lead to conditions like patellofemoral pain syndrome or tendonitis.
Furthermore, the constant effort of lifting the legs from a disadvantaged position can strain the hip flexor muscles and even lead to hip impingement issues.
By finding your ideal drum throne height, you align your joints in a way that minimizes stress and allows your muscles to function within their optimal range of motion.
This proactive approach to ergonomics is not a suggestion but a requirement for any drummer who wishes to avoid the debilitating injuries that have cut short the careers of many talented musicians.
How to Find the Proper Height for Your Drum Throne: 3 Simple Methods
Determining your personal optimal drum throne height is a straightforward process of experimentation and listening to your body.
While there is no single measurement that fits all, there are universally accepted principles and methods that will guide you to the perfect position.
The goal is to find a height that provides stability, promotes a healthy posture, and facilitates effortless movement.
It’s important to remember that the best drum throne height for you might feel slightly different from another drummer’s, due to variations in body proportions, flexibility, and playing style.
The following three methods provide a comprehensive framework for discovering what works best for you.
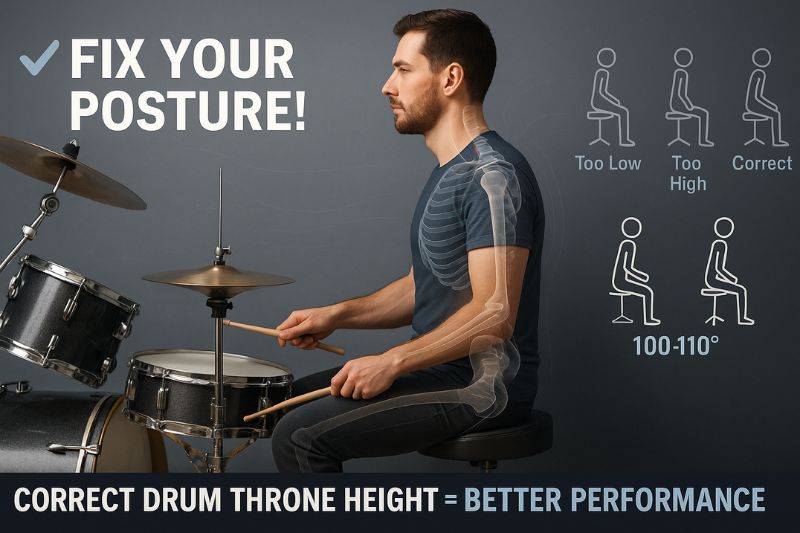
Method 1: The “Slightly Above the Knees” Rule (The Gold Standard)
The most widely recommended and reliable method for finding the proper drum throne height is to ensure your hips are positioned slightly higher than your knees when your feet are placed on the pedals.
This creates a downward slope in your thighs, resulting in an angle of approximately 100-110 degrees at your knee joint, rather than a sharp 90-degree angle or less.
This “90-degree-plus” angle is the ergonomic sweet spot for drummers.
How to achieve it:
- Initial Setup:
- Place your throne behind your drum kit and sit down.
- Place your feet on your bass drum and hi-hat pedals in your natural playing position.
- Observe Your Thighs:
- Look at the angle of your upper legs.
- Are they parallel to the floor? Are your knees higher than your hip joints? If so, your throne is too low.
- Adjust and Re-evaluate:
- Raise the throne in small increments.
- After each adjustment, sit back down, place your feet on the pedals, and re-observe the angle.
- Find the Sweet Spot:
- Continue raising the throne until you see a gentle, downward slope from your hips to your knees.
- Your thighs should not be steep like a ski slope, but comfortably angled downwards.
- This position should feel balanced and powerful, allowing you to press the pedals without lifting your entire leg.
This method is considered the gold standard because it naturally aligns the pelvis and spine, engages gravity to your advantage, and places your joints in a low-stress position.
Method 2: The Standing Start
For those setting up a kit for the first time or looking for a quick and reliable baseline, the “Standing Start” method is an excellent point of departure.
It provides a very close approximation of the correct drum throne height before you even sit down, saving you time in the initial setup phase.
How to use it:
- Stand Beside Your Throne:
- Position yourself standing right next to your drum throne.
- Align with Your Kneecap:
- Adjust the height of the throne’s seat so that the very top surface of the cushion is level with, or just slightly above, the top of your kneecap.
- Test and Refine:
- Sit on the throne at this height.
- More often than not, you will find this position is very close to the ideal “hips-above-knees” posture.
- From here, you can make minor micro-adjustments up or down to dial in the perfect feel.
This method is particularly useful in situations where you have to set up quickly, such as at a jam session or on a shared backline kit.
It provides a consistent and ergonomically sound starting point every single time.
Method 3: Considering Your Playing Style
While the first two methods provide a fantastic foundation, the ultimate best drum throne height can also be influenced by your primary foot technique.
The two main styles, heel-up and heel-down, can benefit from slight variations in height.
- Heel-Up Technique:
- This is the more common technique for rock, pop, and metal, where the heel is lifted off the pedal plate and the entire leg is used to generate power.
- Players using this technique almost universally benefit from a slightly higher throne setting.
- The increased height provides more leverage and makes it easier to use the full weight of the leg, resulting in more volume and less fatigue.
- Heel-Down Technique:
- This technique, often used in jazz or for quieter dynamics, involves keeping the heel on the pedal plate and using primarily the ankle muscles for the stroke.
- While the “hips-above-knees” rule still applies to avoid back strain, some heel-down players find a slightly lower (but still ergonomically correct) position to be more comfortable, as it can provide a more solid anchor for the heel.
Experimentation is key: Try playing passages using your dominant technique at different heights (within the ergonomically safe range).
You may find that raising or lowering the throne by even half an inch can make a noticeable difference in your control and comfort for your specific style.
| Method Comparison | Best For | Key Advantage | Potential Downside |
|---|---|---|---|
| 1. Hips Above Knees | All drummers, all styles | Most ergonomically sound, promotes best posture and power. | Can take a few minutes to dial in perfectly. |
| 2. The Standing Start | Beginners, quick setups | Extremely fast and provides a reliable starting point. | May require minor adjustments for final comfort. |
| 3. Style Consideration | Intermediate/Advanced players | Fine-tunes height for specific technical demands. | Should only be explored after establishing a solid ergonomic base. |
Common Mistakes and How to Fix Them
Even with the best intentions, it’s easy to fall into bad habits regarding your proper throne height for drumming.
Often, these habits develop slowly over time, and the negative effects—like pain or technical struggles—can seem to appear out of nowhere.
Identifying these common errors is the first step toward correcting your setup and unlocking a more comfortable and proficient playing experience.
Many drummers are surprised to learn that a simple adjustment to their proper height drum throne can resolve issues they’ve been battling for years.
Mistake #1: Sitting Too Low
This is, without a doubt, the most common and detrimental mistake drummers make.
A throne that is too low forces the body into a cascade of biomechanical compromises.
- The Problem:
- When your knees are at the same level as or higher than your hips, your pelvis tilts backward, rounding your lower back.
- This posture puts immense pressure on your lumbar discs and forces you to fight gravity with every pedal stroke.
- You are essentially lifting your legs from a bucket, which requires a tremendous amount of effort from your hip flexors and limits the involvement of your larger, more powerful glute and hamstring muscles.
- The Symptoms:
- Persistent lower back ache, especially after playing.
- A feeling of being “stuck” or lacking power in your feet.
- Rapid fatigue in your thighs and hip flexors.
- Difficulty playing fast or complex kick drum patterns.
- A tendency to hit your thighs with your drumsticks when playing the snare.
- The Solution:
- The fix is straightforward but may feel strange at first if you’re accustomed to sitting low.
- Gradually raise your throne until your hips are noticeably higher than your knees when your feet are on the pedals.
- Use the “Standing Start” method as a guide.
- You might need to raise it by several inches.
- Commit to playing at this new height for at least a week.
- While it may feel odd initially, your body will adapt, and you will soon notice a significant increase in comfort, power, and endurance.
Mistake #2: Sitting Too High
While less common than sitting too low, setting your throne too high can create its own set of problems related to balance and control.
- The Problem:
- An excessively high throne position can make you feel unstable and disconnected from the ground.
- It can cause you to slide forward on the seat and place undue pressure on your tailbone and perineum.
- To reach the pedals, you might have to overextend your ankles or point your toes, which can lead to shin splints and a lack of fine control over your dynamics.
- The Symptoms:
- A feeling of being wobbly or off-balance.
- Having to reach for the pedals with your toes.
- Numbness or pain in the tailbone area.
- Difficulty playing softly or with nuance on the pedals.
- Shin and calf muscle fatigue from over-flexing the ankle.
- The Solution:
- Lower your throne in small, half-inch increments until you feel stable and grounded.
- You should be able to rest your entire foot on the pedal comfortably, with your heel able to touch the heel plate if desired.
- Your legs should feel relaxed, and you should not feel perched precariously on top of the seat.
- The goal is to find the balance between the height needed for leverage and the stability needed for control.
Mistake #3: Forgetting to Adjust the Rest of the Kit
Finding the ideal drum throne height is only the first step.
A common error is to change your throne height without subsequently adjusting the other components of your drum kit, particularly the snare drum and hi-hats.
- The Problem:
- Your throne height dictates the foundation of your entire setup.
- If you raise your throne by two inches but leave your snare drum in the same position, you will now be forced to reach down to play it, compromising your arm and wrist technique.
- This can negate the ergonomic benefits you gained by adjusting your throne in the first place.
- The Symptoms:
- Your snare drum is now below your thighs, and you frequently hit your legs.
- You have to bend your wrists at awkward angles to execute rimshots.
- Your hi-hats feel too low, causing your left arm to be cramped.
- The Solution:
- Adopt a “throne-first” setup philosophy.
- Once you have established your correct drum throne height and are sitting comfortably, adjust everything else around you.
- The most critical adjustment is the snare drum.
- Set its height so that when you are playing, your forearms are angled slightly downward, and you have ample clearance above your thighs.
- A good rule of thumb is to have the top rim of the snare about 2-3 inches above the top of your legs.
- Then, adjust your hi-hats, toms, and cymbals to positions that are easily reachable from your new, ergonomically correct seated position.
| Common Mistake | Key Symptom | The Fix |
|---|---|---|
| Sitting Too Low | Chronic lower back pain. | Raise throne until hips are higher than knees. |
| Sitting Too High | Feeling unstable or wobbly. | Lower throne until feet rest comfortably on pedals. |
| “Set and Forget” Kit | Snare drum is too low after raising throne. | Always adjust the kit after setting throne height. |
Frequently Asked Questions (FAQ)
Navigating the nuances of drum set ergonomics can bring up many questions.
Here, we address some of the most common inquiries related to finding the optimum drum throne height and its relationship to the rest of the kit, providing clear and concise answers to help you perfect your setup.
Q1: What is the proper height for a drum throne?
The most universally accepted answer is that the proper height for a drum throne is one that places your hips slightly higher than your knees when your feet are resting on your pedals.
This creates a downward slope of your thighs, typically forming an angle between 100 and 110 degrees at the knee.
This position promotes a neutral spine, reduces strain on your lower back and joints, and allows for the most efficient transfer of power to the pedals.
While the exact height will vary based on your individual body proportions, this “hips-above-knees” principle is the fundamental goal.
Q2: How far should I sit from my drum set?
Once you have established your ideal drum throne height, the next step is to determine the correct distance from the kit.
The key is to find a position that allows you to operate the pedals comfortably without either cramping your legs or overextending them.
A good method is to sit on your throne and place your feet on the pedals.
Your shins should be close to vertical, or angled slightly away from you.
If your knees are bent at an angle much less than 90 degrees (i.e., your heels are almost under your knees), you are too close.
If you have to lock your knees or stretch to reach the pedals, you are too far.
Adjust your throne forward or backward until you find a comfortable middle ground where your legs feel relaxed and ready for action.
Q3: Does the type of throne (round vs. saddle) affect the height?
Yes, the type of throne can subtly affect your ideal height and overall feel.
- Round Thrones:
- These are the traditional style.
- They offer a flat, uniform surface.
- Saddle (or Motorcycle-Style) Thrones:
- These thrones are contoured with two leg cutouts.
While the core principle of keeping your hips above your knees remains the same for both, many drummers find that saddle thrones naturally encourage this posture.
The cutouts allow your thighs to drop into a more natural position and can reduce pressure on the hamstring tendons.
Because of this design, you might find that you can sit slightly lower on a saddle throne compared to a round one while still maintaining the proper hip-to-knee relationship.
Ultimately, the choice is personal, but it’s worth noting that the shape of the seat can influence your final height adjustment.
Q4: Should my feet be flat on the floor when not playing?
From your ideal playing position on the throne, you should be able to comfortably rest your heels on the floor or on the heel plates of your pedals when you are not playing.
You should not be so high that only your toes can touch the ground, as this indicates an unstable position.
Being able to ground your feet provides stability and allows your leg muscles to relax between phrases.
If you have to strain to touch the floor, your throne is likely too high.
Q5: I adjusted my throne, and now it feels weird.
How long does it take to get used to it?
It’s very common for a new, ergonomically correct throne height to feel strange or even “wrong” at first, especially if you have been playing with an improper setup for a long time.
Your muscles have developed a memory for the old position.
It typically takes anywhere from a few days to two weeks of consistent playing for your body to adapt and for the new position to feel natural.
It’s crucial to stick with it. The initial awkwardness will fade, and you will be rewarded with greater comfort, power, and control in the long run.
Conclusion
The journey to becoming a more proficient and comfortable drummer begins not with your hands, but with your foundation.
Mastering the proper drum throne height is a fundamental, non-negotiable step that pays dividends in every aspect of your playing.
By moving away from arbitrary setups and embracing the core ergonomic principle of positioning your hips above your knees, you set in motion a positive chain reaction.
This single adjustment aligns your spine, reduces the risk of debilitating long-term injuries, and unlocks the full potential of your limbs, allowing for greater power, speed, and endurance.
We have explored the critical reasons why your throne height is paramount, from maintaining a healthy posture to enhancing your technical facility.
We have detailed three reliable methods—the “Hips Above Knees” rule, the “Standing Start,” and considerations for your playing style—to guide you to your personal optimal drum throne height.
Furthermore, by identifying and correcting common mistakes like sitting too low or forgetting to adjust the rest of your kit, you can systematically eliminate the barriers holding you back.
Remember that finding the best drum throne height is an investment in your musical future.
Take five minutes today. Go to your kit, apply the principles discussed in this guide, and make the adjustment.
The initial feeling might be unfamiliar, but the long-term benefits are undeniable.
Your back, your knees, and your music will thank you.