A bass drum pedal is the crucial nexus between a drummer’s intention and the foundational pulse of the music.
The failure of this intricate mechanical component during a performance or recording session is a universally dreaded scenario, capable of causing immediate disruption and significant frustration.
Understanding the anatomy of your pedal and possessing the knowledge for repairing broken pedal parts is not merely a technical skill but an essential, cost-effective practice that empowers a drummer to maintain control over their sound and equipment.
This knowledge transforms a potential crisis into a manageable task, saving both time and money while fostering a deeper connection with the instrument.
This comprehensive guide will serve as your definitive resource for drum pedal maintenance and repair.
We will begin by helping you assess whether your pedal is a viable candidate for repair or if a replacement is the more logical path.
Following that, we will delve into a detailed troubleshooting section, complete with a diagnostic table, to help you accurately identify the source of any problem, from the subtlest squeak to a catastrophic snap.
You will find a complete checklist of the essential toolkit required for these repairs, followed by meticulous, step-by-step instructions for fixing the most common pedal failures.
Finally, we will equip you with a robust preventative maintenance routine to ensure your pedal remains reliable, responsive, and ready for any musical challenge, thereby prolonging its life and preserving its performance.
Is Your Pedal Worth Repairing? A Quick Assessment
Determining whether to repair or replace a faulty drum pedal requires a pragmatic evaluation of its initial cost, overall quality, and the availability of replacement parts.
For entry-level or budget pedals, which are often manufactured with less durable materials and simpler designs, a significant failure like a broken footboard hinge or a stripped cam may cost nearly as much to fix in parts and time as purchasing a new unit.
However, for mid-range and professional-grade pedals, repairing is almost always the superior economic and practical choice.
These instruments are engineered for longevity and high performance, with manufacturers like DW, Tama, Pearl, and Yamaha providing extensive catalogs of readily available spare parts, making most repairs straightforward and highly effective.
The construction of the pedal itself is a major factor in this decision.
Pedals with cast metal components are inherently more durable and better candidates for repair than those made from stamped or composite materials.
Furthermore, investing in the repair of a quality pedal you are already familiar and comfortable with preserves the muscle memory and feel you’ve developed, a factor whose value should not be underestimated.
Before making a final decision, consult the manufacturer’s website or a reputable drum parts supplier to confirm the price and availability of the specific components you need.
| Pedal Category | Common Failures | Repair Viability | Recommendation |
|---|---|---|---|
| Beginner/Budget | Cracked plastic parts, stripped soft metal screws, stretched springs. | Low to Medium | For simple fixes like a spring or beater replacement, repair is viable. For major structural damage (e.g., broken footboard), replacement is often more cost-effective. |
| Mid-Range/Semi-Pro | Worn-out hinge bearings, broken chain master link, stretched springs. | High | These pedals are designed to be serviced.
Parts are widely available and affordable relative to the cost of a new pedal. Repair is highly recommended. |
| Professional/High-End | Worn universal joints (double pedals), bearing failure, cosmetic wear. | Very High | These are investment-grade pieces of hardware.
Manufacturers offer comprehensive parts support. Repair is the standard and expected approach to maintenance. |
Identifying the Issue: A Troubleshooting Guide to Common Pedal Failures
Accurately diagnosing a pedal’s ailment is the critical first step toward a successful repair, saving you from purchasing unnecessary parts or addressing the wrong component.
Most pedal failures manifest through audible or tactile cues, such as unwanted noises, a change in resistance, or excessive lateral movement.
By methodically isolating the moving parts of the pedal—the spring assembly, the drive system (chain, belt, or direct drive), the hinge, and the beater assembly—you can pinpoint the source of the problem.
For instance, a high-pitched squeak often points to a friction issue at a pivot point, while a sudden loss of all tension almost invariably indicates a broken spring or a disconnected drive chain.
A sluggish or “spongy” response that wasn’t there before often suggests a spring that has lost its elasticity over time.
This section provides a systematic guide to identifying these common issues.
| Symptom | Most Likely Cause(s) | Secondary Cause(s) | Solution |
|---|---|---|---|
| High-Pitched Squeak | Dry footboard hinge; Dry spring hook/pivot point. | Worn-out bearing; Debris in the chain roller. | Lubrication; Bearing replacement. |
| Sluggish/Spongy Feel | Stretched or fatigued spring. | Gunk/debris in the hinge or drive; Loose spring tension nut. | Spring replacement; Thorough cleaning and lubrication. |
| Footboard Goes Limp | Broken spring; Disconnected or broken drive chain/strap. | Broken connection point on the cam or footboard. | Replace spring; Replace chain/strap or master link. |
| Lateral Wobble | Loose or broken footboard hinge. | Loose heel plate screws; Worn-out frame bearings. | Tighten/replace hinge; Tighten screws; Replace bearings. |
| Beater Slips/Rotates | Loose beater hub screw (memory lock). | Stripped threads in the beater hub; Cracked beater shaft. | Tighten screw; Replace beater hub or beater. |
| Inconsistent Slave Pedal | Worn universal joints in the drive shaft; Mismatched spring tension. | Loose linkage connection points; Friction in slave-side bearings. | Replace drive shaft; Match spring tensions; Lubricate. |
The Annoying Squeak
A persistent squeak is one of the most common yet easily remedied pedal issues.
The noise originates from two metal or plastic parts rubbing together without sufficient lubrication.
To locate the source, remove the pedal from the bass drum and manually operate it with your hand close to your ear.
The most frequent culprits are the main footboard hinge at the heel plate and the points where the tension spring hooks onto the rocker hub and the pedal frame.
The sound can also emanate from the rollers within a drive chain or the main axle bearings if they have become dry or contaminated with debris.
Differentiating between a part that simply needs lubrication and one that is terminally worn is key; a dry part will quiet down immediately with lubricant, whereas a worn-out bearing will often have a rough, grinding feel in addition to the squeak, and the noise may persist or change in character but not disappear entirely after lubrication.
Loss of Tension or “Sluggish” Feel
A pedal that feels heavy, slow, or unresponsive has likely lost its spring tension.
This happens for two primary reasons: either the spring itself has failed, or the assembly holding it has come loose.
The most common cause is a spring that has been stretched beyond its elastic limit through thousands of cycles of compression and release, losing its ability to recoil with the necessary force.
You can diagnose this by visually inspecting the spring; look for coils that appear unevenly spaced or elongated compared to a new spring.
In more dramatic cases, the spring will have physically snapped, which is an unmistakable failure.
Secondly, check the entire spring assembly.
The nut that controls the tension may have vibrated loose over time, reducing the preload on the spring.
Ensure the rocker hub, which connects the spring to the drive system, is secure and functioning correctly.
The Footboard Goes Limp (Snapped Chain or Strap)
A sudden and complete loss of connection between the footboard and the beater assembly signifies a critical failure in the drive system.
When you press the footboard and it offers no resistance, falling limply to the baseplate, the link between it and the cam has been severed.
For pedals with a chain drive, this usually means one of two things: either the master link connecting the chain to the footboard anchor has broken, or, more rarely, a link in the middle of the chain has failed.
For strap-drive pedals, this indicates the nylon or kevlar strap has torn, typically at the point where it connects to the cam or footboard, as these are high-stress areas.
A visual inspection is all that is needed to confirm the point of failure.
Wobble and Instability
Excessive side-to-side play in the footboard is a clear sign of a problem with the heel plate hinge.
This is arguably the most common structural failure point on many pedals, as it bears a tremendous amount of lateral force and friction.
The wobble can be caused by screws that have simply worked themselves loose, in which case tightening them will solve the problem.
More often, however, it indicates that the pin or bearings within the hinge have worn down, creating a gap that allows for the unwanted movement.
On some designs, the metal of the hinge itself can fatigue and crack.
This instability not only feels disconcerting but also leads to inefficient energy transfer, meaning some of the force from your foot is wasted in lateral motion rather than contributing to the beater’s stroke.
The Beater Won’t Stay Put
A bass drum beater that constantly changes its height or angle during play is usually a simple fix.
The problem almost always lies with the beater hub assembly, the mechanism that clamps onto the beater shaft.
There is a drum key-operated screw that applies pressure to hold the shaft in place; this screw can vibrate loose.
Often, this screw is part of a memory lock, a collar that ensures the beater returns to the same height every time.
If tightening this screw doesn’t solve the problem, inspect the threads on both the screw and inside the hub.
If they are stripped, the hub will need to be replaced.
In rarer cases, the beater shaft itself might have a crack, which will prevent it from being held securely.
For Double Pedal Users: The “Lazy” Slave Pedal
Double bass drum pedals present a unique set of potential issues, with the most frequent complaint being a “lazy” or “laggy” slave pedal that doesn’t feel as responsive as the primary one.
This discrepancy is most often caused by wear and tear in the linkage, which is the long drive shaft connecting the two pedals.
This shaft contains two universal joints (U-joints) that allow it to operate at an angle.
Over time, the bearings or pins inside these U-joints can develop play, which creates a small amount of “slop” in the system.
This slop translates to lost motion, meaning the slave pedal has to travel slightly farther before it engages the drive, resulting in a laggy feel.
Another common cause is mismatched spring tension.
If the spring on the slave pedal is set significantly looser than the primary, it will naturally feel less responsive.
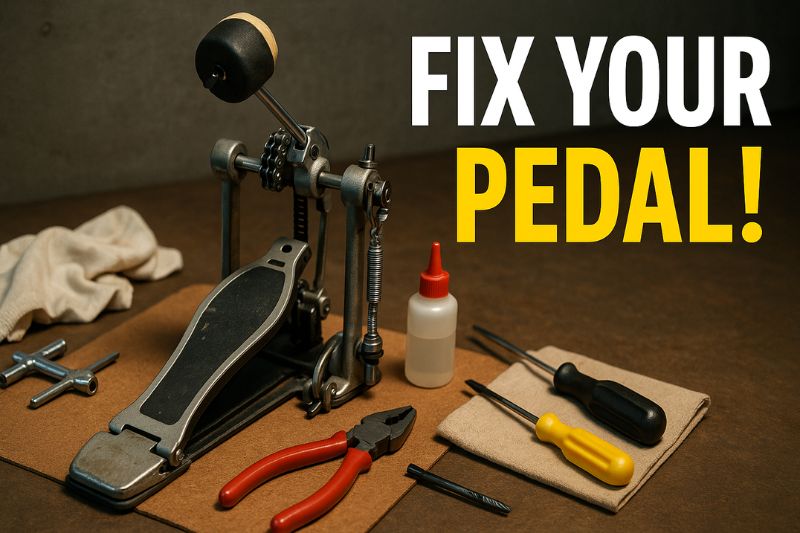
Your Essential Toolkit for Pedal Repair
Assembling a dedicated toolkit for drum hardware maintenance is a wise investment for any serious drummer.
Having the correct tools on hand transforms repairs from frustrating ordeals into quick, efficient procedures.
While many adjustments can be made with a standard drum key, a proper repair often requires a few more specific items to disassemble and reassemble the intricate parts of a modern bass drum pedal.
This curated list covers the essentials you’ll need to tackle nearly any repair job with confidence.
| Tool | Primary Use(s) | Why It’s Essential |
|---|---|---|
| Drum Key | Adjusting beater hub, memory locks, spring tension. | The most fundamental tool for any drummer. You likely already have several. |
| Pliers (Needle-Nose) | Manipulating chain master links, holding small nuts, retrieving dropped parts. | Their fine tip allows for precision work in the tight confines of a pedal’s mechanism. |
| Screwdriver Set | Removing heel plates, base plates, and other non-drum key fasteners. | A set with various sizes of Phillips and flathead bits is crucial for full disassembly. |
| Allen Wrench Set | Adjusting cam positions, linkage connectors, and some beater hubs. | Many manufacturers use hex screws.
A full set with both metric and imperial sizes is vital. |
| Bearing/Hinge Lubricant | Quieting squeaks, ensuring smooth operation of moving parts. | Specific lubricants like white lithium grease or 3-in-1 oil prevent wear and reduce friction. |
| Clean Cloth/Rag | Wiping away old grease, dirt, and excess lubricant. | Starting with clean components is a cornerstone of proper mechanical maintenance. |
| Small Parts Container | Keeping screws, washers, and nuts organized during disassembly. | A magnetic bowl or a simple plastic container prevents the loss of critical small parts. |
Step-by-Step Repair Guides
This section provides detailed, actionable instructions for the most common pedal repairs.
Before you begin any disassembly, it is highly recommended to take a few clear “before” photos of your pedal from different angles.
These images can serve as an invaluable reference when it’s time to put everything back together.
Work on a clean, well-lit surface and use your parts container to keep everything organized.
How to Replace a Drum Pedal Spring
A broken or fatigued spring is one of the most frequent and straightforward repairs.
- Release All Tension:
- Turn the spring tension adjustment nut counter-clockwise until it is completely loose and there is no preload on the spring.
- This is a critical safety step to prevent the spring from snapping unexpectedly.
- Unhook the Old Spring:
- Carefully unhook the top of the spring from the rocker assembly (the part that connects to the drive system).
- Then, unhook the bottom of the spring from the pedal’s frame or baseplate.
- Inspect the Assembly:
- With the spring removed, take a moment to inspect the felt or plastic inserts inside the spring.
- These prevent metal-on-metal noise.
- If they are worn or missing, now is the perfect time to replace them.
- Install the New Spring:
- Hook the new spring onto the bottom anchor point first.
- Then, stretch it slightly and hook the top onto the rocker assembly.
- Ensure it is seated securely in its designated grooves.
- Re-apply and Adjust Tension:
- Turn the tension nut clockwise to your desired feel.
- A good starting point is to match the tension you had previously.
- Play the pedal and make small adjustments until the response feels comfortable and balanced for your playing style.
How to Fix a Broken Pedal Chain
This repair can range from replacing a single link to installing a whole new chain.
- Remove the Broken Chain:
- First, detach the chain from the footboard.
- This is usually done by removing a screw or master link at the base of the footboard.
- Next, unhook or unscrew the chain from the cam at the top of the drive system.
- Assess the Damage:
- If a single master link is broken, you only need to replace that specific part.
- If a link in the middle of the chain is broken, it is often best to replace the entire chain assembly, as this can be a sign of metal fatigue that may affect other links.
- Install the New Chain/Link:
- If replacing a master link, use your needle-nose pliers to attach the new link, ensuring it is securely closed.
- If installing a new chain, attach it to the cam first, then connect it to the anchor point on the footboard.
- Secure and Test:
- Double-check that all connection points are tight and secure.
- Manually operate the pedal to ensure the chain moves smoothly along the cam without binding or skipping.
How to Lubricate a Squeaky Pedal
A systematic approach will ensure you silence the squeak without overlubricating.
- Identify the Source:
- As detailed in the troubleshooting section, manually operate the pedal to pinpoint the exact location of the squeak.
- Isolate whether it’s the hinge, spring, or bearings.
- Clean the Area:
- Before applying new lubricant, use a clean rag to wipe away any old, gunked-up grease, dust, and grime from the pivot point.
- Applying new lubricant over old dirt can create an abrasive paste that accelerates wear.
- Apply Lubricant Sparingly:
- Apply a single, small drop of oil or a tiny dab of grease directly onto the moving part.
- For a hinge, apply it to the pin.
- For a spring, apply it where the hook makes contact with the frame.
- For a chain, apply it to the rollers.
- Work it In:
- Operate the pedal 20-30 times to allow the lubricant to penetrate and fully coat the contact surfaces.
- Wipe Away Excess:
- Use a clean part of your rag to wipe away any excess lubricant.
- Excess lube can attract dust and dirt, leading to future problems.
How to Replace a Footboard Hinge
This is a more involved repair but is crucial for restoring a pedal’s stability.
- Disassemble the Heel Plate:
- Begin by removing all the screws that connect the heel plate to the main footboard.
- Then, remove the screws connecting the heel plate to the pedal’s baseplate.
- Remove the Old Hinge:
- With all screws removed, the footboard and baseplate will separate, and you can lift out the old, broken hinge assembly.
- Pay close attention to the orientation of the hinge and any washers or bearings that may be present.
- Clean and Position the New Hinge:
- Thoroughly clean the surfaces of the footboard and baseplate where the new hinge will sit.
- Position the new hinge correctly, ensuring any screw holes line up perfectly.
- Reassemble Carefully:
- Start by loosely threading all the screws back into place.
- Do not tighten any single screw all the way down at first.
- Once all screws are in place, tighten them incrementally in a star or crisscross pattern.
- This ensures the hinge seats evenly without being subjected to warping stress.
- Test for Smoothness:
- Once fully assembled, operate the pedal.
- It should move freely and smoothly with no binding and, most importantly, no side-to-side wobble.
Preventative Maintenance: Keep Your Pedal Gig-Ready
The best way to handle a broken pedal part is to prevent it from breaking in the first place.
A consistent preventative maintenance routine can dramatically extend the life of your pedal and help you identify potential problems before they lead to a catastrophic failure on stage.
This doesn’t require hours of work; just a few minutes of attention every few weeks can make all the difference.
- Regular Cleaning:
- At least once a month, wipe down your entire pedal with a clean, dry cloth.
- Pay special attention to the drive chain and the hinge area, as this is where dust from sticks and grime from shoes tends to accumulate.
- A clean pedal is a happy pedal.
- The Pre-Gig Checkup:
- Before every single performance, rehearsal, or recording session, perform a quick tactile check.
- Grab the beater and ensure it’s tight.
- Wiggle the footboard to check for wobble.
- Check that the pedal is securely clamped to the bass drum hoop.
- This five-second check can avert disaster.
- Listen to Your Pedal:
- Your ears are one of your best diagnostic tools.
- Be attuned to any new sounds your pedal makes.
- A new click, squeak, or grinding sound is the pedal’s way of telling you that something needs attention.
- Investigate these sounds immediately rather than hoping they will go away.
- Lubrication Schedule:
- Don’t wait for a squeak to appear.
- Proactively lubricate the key pivot points (hinge, spring hooks) every few months, or more often if you play frequently or in dusty environments.
- Proper Transport:
- Never transport your pedal by just tossing it into a large hardware case with heavy cymbal stands.
- The impact from other hardware can easily damage the delicate parts of a pedal.
- Invest in a dedicated pedal case or, at the very least, wrap it in a towel and place it carefully in your hardware bag.
Conclusion
Your bass drum pedal is a precision piece of mechanical engineering that endures an incredible amount of stress.
By moving beyond the view of it as a single, mysterious object and seeing it instead as an assembly of serviceable parts, you fundamentally change your relationship with your gear.
The ability to diagnose a problem, source the correct components, and perform your own drum pedal repair is an empowering skill that saves money, prevents performance-ending failures, and ensures your most vital piece of hardware always feels exactly the way you need it to.
Embracing this DIY ethic makes you a more self-sufficient and knowledgeable musician.
The confidence gained from knowing you can handle these common mechanical issues is invaluable.
So the next time your pedal develops a squeak or feels sluggish, don’t despair.
Use this guide, grab your tools, and give your pedal the care it deserves.
Have you ever had a pedal break at the worst possible moment? Share your story or your own invaluable repair tips in the comments below!