The ergonomics of your drum pedal setup represent the single most influential factor in your long-term health, comfort, and technical proficiency as a drummer.
Achieving an ergonomic configuration means meticulously arranging your drum throne, pedals, and by extension, the entire kit, to align perfectly with your body’s natural mechanics, thereby minimizing physical strain and maximizing your efficiency of motion.
Many drummers, particularly those in the early stages of their journey, inadvertently adopt setups that force their bodies into unnatural positions, leading to a host of issues ranging from nagging discomfort to chronic, performance-hindering injuries.
This comprehensive guide will illuminate the path to an optimized setup, ensuring every practice session is productive and pain-free.
We will delve into the foundational principles of posture and throne height, explore the precise art of pedal placement for both single and double bass configurations, and uncover the nuanced adjustments that transform a standard setup into a personalized, high-performance interface between you and your instrument.
By understanding and applying these principles, you will not only safeguard your physical well-being but also unlock new levels of power, speed, and endurance in your playing.
The Foundation: Your Drum Throne and Posture
The journey to an ergonomic pedal setup unequivocally begins with your drum throne and posture, as this combination dictates the entire biomechanical chain of your lower body.
Before a single pedal is placed, establishing a stable and correct seating position is paramount; it is the bedrock upon which an efficient and comfortable setup is built.
Your throne is not merely a seat but the central point of balance and control from which all your movements emanate.
An incorrect throne height or poor posture will inevitably cause a cascade of compensatory adjustments throughout your body, forcing muscles and joints to work harder, leading to premature fatigue and increasing the risk of injury.
Therefore, dedicating time to perfecting this foundational element is a non-negotiable first step.
Finding the Right Throne Height
Securing the correct drum throne height is achieved when your thighs are angled slightly downwards from your hips, creating an angle just greater than 90 degrees at your knees when your feet are resting on the pedals.
This specific positioning utilizes gravity to your advantage, allowing your legs to rest their weight naturally onto the pedals without requiring constant muscular effort to hold them in place.
To find this optimal height, begin by sitting on the throne with your feet flat on the floor.
Adjust the height until your thighs are roughly parallel to the ground.
Next, place your feet onto your pedals; your thighs should now adopt that crucial slight downward slope.
If your knees are higher than your hips (an angle less than 90 degrees), your throne is too low, which places significant strain on your hip flexors and lower back.
Conversely, if your throne is too high, you may feel disconnected from the pedals and your legs may fatigue quickly from over-extension.
| Throne Height Issue | Consequence | Ergonomic Solution |
|---|---|---|
| Too Low | Hips are below the knees, causing compression in the hip joint and strain on the lower back and hip flexors.
Restricts leg mobility. |
Raise the throne until thighs are angled slightly downward, ensuring the angle at the knee is greater than 90 degrees. |
| Too High | Creates instability and forces the leg to over-extend to reach the pedals.
Leads to fatigue in the hamstrings and calf muscles. |
Lower the throne so that feet can comfortably rest on the pedals while maintaining the slight downward angle of the thighs. |
| Correct Height | Hips are slightly above the knees, allowing for a relaxed leg position and efficient transfer of energy to the pedals.
Promotes balance. |
Maintain this position, ensuring your feet can move freely without unnecessary tension in the legs or back. |
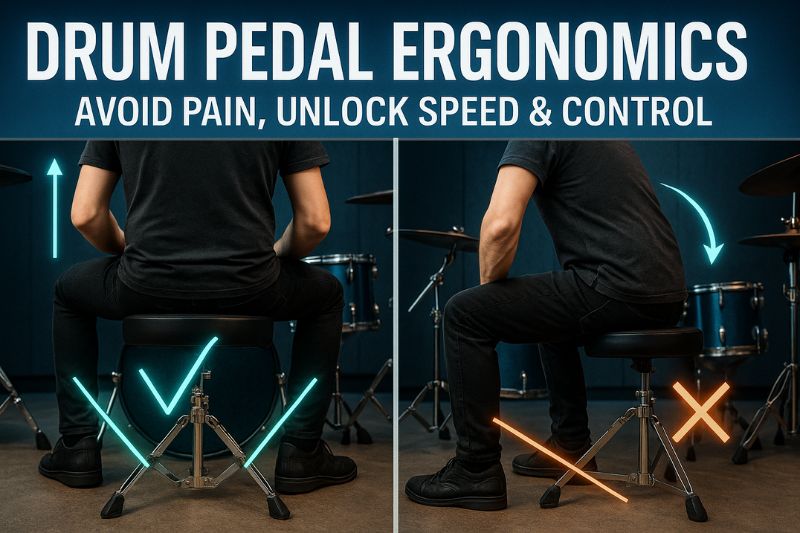
Achieving Correct Posture
Proper posture is maintained by sitting with a straight, elongated spine, engaging your core muscles for stability, and keeping your shoulders relaxed and drawn back.
The foundation of this posture lies in positioning your weight directly over your “sit bones” (ischial tuberosities), which are the two bony points at the bottom of your pelvis.
You can locate them by sitting on your hands; the prominent bones you feel are your sit bones.
Centering your weight on these points creates a stable, balanced base and naturally encourages your spine to align correctly.
Avoid the common tendency to slouch, as this rounds the lower back (lumbar spine), placing immense strain on the spinal discs and surrounding muscles.
A straight spine allows your respiratory system to function optimally and ensures that the force generated for your pedal strokes originates from the correct muscle groups, rather than from a compromised and inefficient posture.
Finding Your Natural Foot Placement
Discovering your natural foot placement is the critical next step, as it ensures your pedals will be positioned in a way that is perfectly symmetrical and biomechanically sound for your unique body.
Your body is the ultimate template for your drum kit’s layout.
Instead of contorting your limbs to fit a predetermined drum arrangement, you must arrange the instrument to fit your body.
This principle is most crucial when it comes to your feet, which, along with your throne, form the stable tripod that supports your entire upper body and facilitates independent limb movement.
An unnatural foot position forces your hips and spine into a state of constant, subtle rotation and tension, which is a direct path to lower back pain and inefficient playing.
The “V” Shape
Your natural foot placement typically forms a slight “V” shape, which you can find by sitting comfortably on your correctly adjusted throne, closing your eyes, and allowing your legs and feet to fall into their most relaxed, natural position.
Sit on your throne, let your legs hang loosely, and then lift them and let them drop a few times.
The position they settle into is your body’s preferred stance.
For most people, the feet will not be perfectly parallel but will point slightly outwards, forming a symmetrical “V”.
This angle reflects the natural rotation of your hip joints.
Forcing your feet to be parallel if it’s not your natural position can introduce torque and strain into your ankles, knees, and hips.
Symmetry is Key
Symmetry in your setup is paramount because it promotes balance and prevents the muscular imbalances that lead to chronic pain.
The concept of the “tripod”—formed by your two feet on the pedals and your point of contact on the throne—is the core of your stability.
If one foot is positioned further forward, further back, or at a different angle than the other, this tripod becomes unstable.
Your body will then subconsciously engage various muscles, particularly in your core and lower back, to counteract this imbalance.
Over time, this constant, low-level muscular effort leads to fatigue, stiffness, and potentially serious injury.
A symmetrical setup allows your body to remain balanced and relaxed, freeing up your limbs to move with maximum efficiency and independence.
Marking Your Spot
A highly effective and practical method for ensuring consistent setup is to mark your ideal foot positions on your drum rug.
Once you have determined your natural, relaxed foot placement, use a piece of chalk, a silver marker, or small pieces of gaffer tape to outline where the heels and front of your pedals should be.
This simple action eliminates guesswork and guarantees that every time you set up your kit, whether at home, in the studio, or on stage, your foundation will be ergonomically perfect.
This consistency is crucial for developing muscle memory and allows you to focus entirely on your playing, confident that your setup is supporting, not hindering, your performance.
Positioning Your Pedals
The correct positioning of your pedals is a direct translation of your natural foot placement onto the hardware of your drum kit.
This stage involves moving the bass drum and hi-hat stand to meet your feet, rather than the common but erroneous practice of adjusting your feet to meet the pedals.
This player-centric approach ensures that your body remains in a neutral, relaxed, and powerful posture.
The placement of your snare drum is also intrinsically linked to your pedal setup, as it must sit comfortably between your legs without forcing them apart or causing you to shift your weight.
Single Pedal Setup (Bass Drum and Hi-Hat)
For a standard single pedal setup, the process begins by placing your bass drum pedal directly under your dominant foot as it rests in its natural position.
Once the bass drum pedal is set, bring the bass drum itself to the pedal and clamp it on, ensuring the drum is angled in such a way that the pedal remains in its ergonomically correct spot.
Next, place your hi-hat stand so that its pedal aligns perfectly with your non-dominant foot’s natural resting position.
This may require you to rotate the legs of the hi-hat stand to make room for your other pedals and the snare stand.
Finally, position your snare drum and stand directly in the center, between your legs.
You should be able to comfortably reach the center of the snare and perform rimshots without your legs or the stands obstructing your movement.
Double Pedal Setup
Positioning a double bass drum pedal requires an even greater commitment to symmetry.
Begin by connecting the primary pedal (the one with the beaters attached) and the slave pedal via the drive shaft.
Place the primary pedal under your dominant foot and the slave pedal under your non-dominant foot, ensuring both are positioned according to your natural “V” shape.
The distance between them should mirror the natural width of your stance.
A common challenge with double pedals is interference with the hi-hat stand.
To solve this, consider these options:
- Use a hi-hat stand with rotatable legs: This allows you to swing the legs out of the way of the slave pedal.
- Use a two-legged hi-hat stand: These are specifically designed to accommodate double pedals.
- Place the slave pedal to the left of the hi-hat pedal: While less common, some drummers find this arrangement comfortable.
The ultimate goal is to create a perfectly symmetrical arc of pedals that allows for effortless and balanced movement between them.
Matching Pedal Angles
To achieve a consistent feel between your feet, it is beneficial to match the travel distance and angle of your hi-hat and bass drum pedals.
An effective method for this is to first press your bass drum pedal down to its point of contact with the head.
While holding it there, press your hi-hat pedal down with your other foot.
Loosen the hi-hat clutch, allow the top cymbal to drop onto the bottom one, and then re-tighten the clutch.
Now, when both pedals are fully depressed, your ankles will be at a similar angle, and the feeling of “bottoming out” will be more consistent across both feet, which aids in developing coordinated footwork.
Fine-Tuning Your Pedals for Comfort and Performance
Fine-tuning your pedals is the final, crucial stage where you personalize the hardware to respond precisely to your touch, technique, and musical demands.
While factory settings provide a generic starting point, optimal performance is unlocked by adjusting key components like the spring tension, beater angle, and footboard height.
These adjustments are not about finding a single “correct” setting, but rather about discovering the combination that feels most like a natural extension of your own body.
This process is iterative and may change as your playing style evolves, so it’s valuable to understand what each adjustment does and how it impacts the pedal’s feel and response.
Spring Tension
The spring tension dictates the speed and force of the beater’s return after striking the drumhead, which directly influences the pedal’s rebound and overall feel.
A tighter spring will cause the beater to rebound more quickly and forcefully, which can be beneficial for playing fast patterns as it helps “push” your foot back up for the next stroke.
However, if the tension is too high, it can feel like you’re fighting against the pedal, leading to fatigue.
Conversely, a looser spring tension provides less assistance, requiring more muscular effort from your leg to lift the beater for each stroke, but it can offer a greater sense of dynamic control for softer playing.
Finding the right balance is key; the spring should be just tight enough to keep up with your fastest playing without feeling overly resistant.
Beater Angle and Height
The beater’s starting position, or angle, significantly affects both the power and the speed of your stroke.
A beater that starts further away from the head has a longer path to travel, allowing it to build more momentum and result in a more powerful, louder stroke.
This is often preferred for rock and metal genres.
A beater positioned closer to the head has a shorter, quicker stroke, which facilitates faster playing and intricate patterns, as less motion is required.
The beater height—where it strikes the bass drum head—also impacts the sound.
A strike dead in the center produces the most fundamental pitch and boom, while striking slightly off-center can bring out different overtones.
Most drummers aim for the center or just slightly above it.
| Pedal Adjustment | Effect on Feel and Performance | Typical Application |
|---|---|---|
| Spring Tension | Tighter: Faster rebound, feels “springier,” less work for foot on the upstroke.
Looser: Slower rebound, feels “heavier,” more work for the leg. |
Tighter: Speed metal, punk, situations requiring rapid single strokes.
Looser: Jazz, blues, situations requiring nuanced dynamic control. |
| Beater Angle | Further from Head: Longer stroke, more power/volume, slower feel.
Closer to Head: Shorter stroke, less power/volume, faster feel. |
Further: Rock, pop, genres requiring powerful backbeats. Closer: Jazz, funk, genres requiring fast, articulate patterns. |
| Footboard Height | Higher: More leverage, can feel more powerful, longer foot motion.
Lower: Less travel for the foot, can feel quicker and more direct. |
Higher: Heel-up players seeking maximum power.
Lower: Heel-down players or those using slide/heel-toe techniques. |
Footboard Angle/Height
The height and angle of the footboard determine how much your foot has to move to execute a stroke.
Many modern pedals allow you to adjust the footboard height independently of the beater angle.
A higher footboard can provide more leverage, which some players feel translates to more power.
A lower footboard results in a shorter, more compact stroke, which can feel faster and more efficient, particularly for techniques like the heel-toe or slide method.
The ideal height is one that allows your foot to rest comfortably on the pedal without tension and to execute strokes without excessive, wasted motion.
Experiment with different heights to find the one that best complements your chosen playing technique (heel-up, heel-down, or a hybrid).
Common Ergonomic Mistakes and How to Fix Them
Even with the best intentions, it’s easy to fall into common ergonomic traps that can undermine your playing and lead to discomfort.
Identifying and correcting these mistakes is just as important as the initial setup process.
Regularly performing a self-assessment of your posture and setup, perhaps by recording yourself or playing in front of a mirror, can help you catch these issues before they become ingrained habits.
Here is a list of common mistakes and their solutions:
- Slouching:
- The most frequent postural error is allowing the back to round, especially during long sessions.
- Fix:
- Actively think about sitting up straight, engaging your core muscles, and pulling your shoulders back.
- Imagine a string pulling the top of your head towards the ceiling.
- Taking regular breaks to stand and stretch can also help reset your posture.
- Fix:
- The most frequent postural error is allowing the back to round, especially during long sessions.
- Pedals Too Close or Too Far:
- Positioning pedals too close cramps your legs, while placing them too far away forces you to over-reach, straining your back and legs.
- Fix:
- Revisit the “natural foot placement” step.
- Your pedals should be positioned where your feet land naturally when you are sitting with a correct, comfortable posture.
- Fix:
- Positioning pedals too close cramps your legs, while placing them too far away forces you to over-reach, straining your back and legs.
- Asymmetrical Setup:
- Having one pedal further forward or angled differently than the other is a common cause of lower back pain.
- Fix:
- Use your drumsticks or a tape measure to ensure your pedals are equidistant from a central point (like the snare stand) and at matching angles.
- Using tape on your drum rug to mark positions is the best way to guarantee symmetry every time.
- Fix:
- Having one pedal further forward or angled differently than the other is a common cause of lower back pain.
- Ignoring Discomfort:
- Playing through pain is a recipe for serious injury.
- Fix:
- Treat pain as a signal from your body that something is wrong with your setup or technique.
- Stop, analyze what might be causing the issue, and make adjustments.
- Don’t be afraid to completely re-evaluate your setup from scratch.
- Fix:
- Playing through pain is a recipe for serious injury.
- Tension in the Upper Body:
- Many drummers hold unnecessary tension in their shoulders, neck, and arms, which can be a byproduct of a poor lower-body setup.
- Fix:
- Consciously relax your shoulders, letting them drop away from your ears.
- Ensure your cymbals and toms are positioned so you don’t have to lunge or raise your shoulders to reach them.
- A stable lower body foundation promotes a relaxed upper body.
- Fix:
- Many drummers hold unnecessary tension in their shoulders, neck, and arms, which can be a byproduct of a poor lower-body setup.
The Payoff: Benefits of an Ergonomic Setup
Investing the time and effort to create an ergonomic drum setup yields substantial rewards that extend far beyond simply avoiding pain.
A setup that is tailored to your body becomes a seamless interface, allowing for a more direct and expressive translation of your musical ideas onto the instrument.
You will find that playing becomes less of a physical struggle and more of a fluid, enjoyable activity.
This optimization impacts every facet of your drumming, from your technical ability to your long-term health as a musician.
Injury Prevention
The most critical benefit of an ergonomic setup is the significant reduction in the risk of playing-related musculoskeletal disorders (PRMDs).
By aligning your body naturally, you minimize the unnatural stress and strain on your joints, ligaments, and muscles.
| Body Area | Potential Injury from Poor Ergonomics | How Ergonomic Setup Prevents It |
|---|---|---|
| Lower Back | Chronic pain, muscle strain, disc issues. | A correct throne height and symmetrical pedal setup maintain a neutral spine, eliminating twisting and slouching. |
| Hips | Tendonitis, bursitis, hip flexor strain. | A throne height that places hips above the knees prevents compression and allows for free movement. |
| Knees | Patellar tendonitis, general joint pain. | Proper pedal placement prevents unnatural twisting or side-to-side motion of the knee joint. |
| Ankles/Feet | Achilles tendonitis, shin splints. | Fine-tuned pedals and correct technique ensure efficient motion without over-straining the smaller muscles and tendons. |
Improved Performance
An ergonomic setup directly translates to enhanced musical performance.
When your body is not fighting against a poorly configured kit, you unlock a new level of physical freedom.
Here are some of the performance benefits:
- Increased Speed and Control: Efficient movement eliminates wasted motion, allowing your feet to move more quickly and with greater precision.
- Enhanced Power: By using your body’s natural mechanics and larger muscle groups correctly, you can generate more power with less effort.
- Improved Endurance: When your muscles are working efficiently and not under constant strain, fatigue sets in much more slowly, enabling you to play for longer periods without a drop in performance.
- Better Balance and Coordination: A stable, symmetrical foundation improves your overall balance, which is crucial for developing independence between all four limbs.
Greater Comfort and Enjoyment
Ultimately, drumming should be a source of joy, not a cause of physical suffering.
A comfortable setup allows you to immerse yourself fully in the music without being distracted by aches and pains.
This heightened level of comfort makes practice sessions more productive and enjoyable, fostering a more positive and sustainable relationship with your instrument for years to come.
Conclusion
The meticulous process of establishing an ergonomic pedal and drum kit setup is not a one-time task but an ongoing commitment to your health and musicianship.
As we have explored, the foundation of this process is built upon a correct throne height and a balanced, upright posture.
From this stable base, discovering and honoring your body’s natural foot placement is the key to creating a symmetrical and tension-free lower body interface.
By positioning your pedals to meet your feet, fine-tuning the hardware for a responsive feel, and remaining vigilant against common ergonomic mistakes, you transform your drum set from a collection of instruments into a personalized, high-performance machine.
We urge you to take the time to critically evaluate your current configuration.
Use the principles and techniques outlined in this guide—from finding your sit bones to marking your pedal positions on a rug—to systematically build a setup that is a true extension of your own body.
The immediate benefits of increased comfort and the long-term rewards of improved performance and injury prevention are invaluable.
Remember, an ergonomic setup is the most important investment you can make in your lifelong journey as a drummer, ensuring that you can play with passion, power, and precision for decades to come.