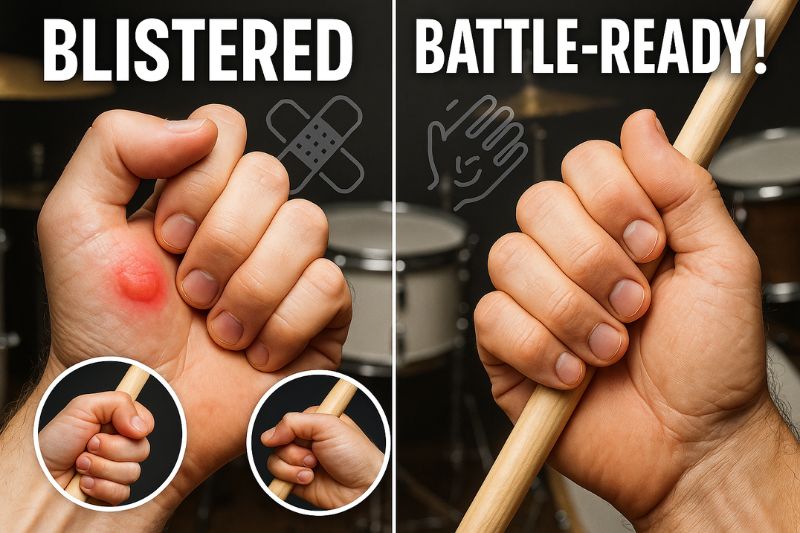
The searing sting of a fresh blister can abruptly end a passionate drumming session, turning rhythmic bliss into a painful ordeal.
The formation of blisters from drumming is a direct and painful consequence of excessive friction between the skin and the drumstick, a problem most often rooted in improper grip technique and a sudden increase in playing intensity.
This common affliction, however, is not a rite of passage that drummers must endure; it is an entirely preventable issue.
By understanding the underlying causes and adopting smarter habits, you can protect your hands, allow them to develop resilient drumming calluses naturally, and ensure that your focus remains squarely on the music, not on the pain.
This comprehensive guide will serve as your definitive resource for conquering drum stick blisters once and for all.
We will begin by deconstructing the root causes, exploring how everything from your grip and hand technique to your choice of sticks contributes to the problem.
From there, we will delve into a detailed regimen for prevention, offering actionable strategies and exercises that represent the most powerful defense for your hands.
Should a blister still manage to form, you will learn the correct first-aid and treatment protocols to heal quickly and prevent infection.
Finally, we will explore the natural progression from sensitive skin to tough, protective drum calluses, explaining how to cultivate them properly as a long-term solution.
Why Do Drummers Get Blisters?
The formation of drum stick blisters is a direct physiological response to excessive friction, pressure, and heat generated between a drummer’s skin and the drumstick.
When a localized area of skin is repeatedly rubbed, the upper layer (epidermis) separates from the layers beneath.
The body responds to this injury by filling the resulting gap with a protective fluid called serum, creating the familiar, painful bubble of a blister.
This process is the body’s attempt to cushion the underlying tissue from further damage.
For drummers, this friction is a constant occupational hazard, but certain factors dramatically increase the likelihood of it causing an injury.
The #1 Culprit: Improper Grip & Technique
The most prevalent cause of drumming-related blisters is an overly tight grip, commonly known as a “death grip.” When a drummer clenches the sticks with excessive force, it fundamentally changes the physics of the interaction.
Instead of allowing the stick to pivot freely at the fulcrum point and rebound naturally off the drumhead, the tight grip locks the stick to the hand.
This action forces the entirety of the stick’s motion—every single stroke and vibration—to be absorbed directly by the skin.
This constant, high-pressure rubbing action is the fastest way to generate the intense friction and heat necessary to form a blister.
Beyond simply gripping too tightly, flawed hand technique contributes significantly to the development of painful blisters.
Drummers who rely on brute force from their arms rather than finessed control from their wrists and fingers often create a “wiping” or “scraping” motion across the drumhead.
This inefficient technique not only produces a poor sound but also causes the stick to slide and shift unnecessarily within the hand, creating friction in multiple spots.
The goal of proper technique is to create a fluid stroke where the hand acts as a hinge, not a clamp.
A failure to master this fundamental concept of motion is a primary reason why many drummers, especially beginners, find their hands covered in painful drumming blisters.
Different drumming grips, such as the variety of matched grips and the traditional grip, create distinct fulcrum points that can become blister “hot spots” if technique is not properly executed.
- American Grip: Blisters often form on the inside of the index finger and the thumb pad, where the primary fulcrum is located.
- German Grip: With its emphasis on wrist rotation, blisters can appear on the back of the hand or along the middle fingers if the grip is too tight.
- French Grip: Utilizing finger control with the thumbs on top, this grip can cause blisters on the thumb and index finger, particularly during powerful strokes.
- Traditional Grip: The underhand grip of the non-dominant hand creates unique pressure points, often causing blisters in the webbing between the thumb and index finger or on the ring finger.
Recognizing where your blisters form is a diagnostic tool that can help you identify specific flaws in your chosen grip technique.
New to gripping technique? Check out our complete guide on How to Hold Drumsticks to master the basics and avoid blisters.
The Wrong Equipment and Habits
The physical characteristics of your drumsticks can either mitigate or exacerbate the friction that leads to blisters.
Sticks heavily coated in lacquer or paint create a smooth, non-porous surface that doesn’t absorb sweat, leading to a slippery grip that drummers often compensate for by squeezing harder.
Conversely, sticks with a “dipped” rubber coating, while designed to improve grip, can drastically increase the coefficient of friction, effectively “grabbing” the skin and causing severe blisters during slides and rolls.
The ideal stick often has a light satin finish or is left natural, providing a good balance of grip and smoothness.
| Stick Characteristic | High Blister Risk Factor | Low Blister Risk Factor |
|---|---|---|
| Finish | Thick Lacquer, Gloss Paint, Rubber “Dip” | Natural Wood, Light Satin, Waxed |
| Material | Unbalanced or Poor Quality Wood | Well-balanced Hickory, Maple, or Oak |
| Condition | Splintered, Chipped, or Frayed | Smooth and Free of Imperfections |
A sudden and dramatic increase in playing duration is a frequent catalyst for blister formation, especially for drummers whose hands are not yet conditioned.
If you typically practice for 30 minutes a day and then suddenly play a three-hour gig or an all-day rehearsal, your skin is simply not prepared for the extended stress.
Building up your skin’s resilience, much like building muscle, requires gradual and consistent exposure.
Without this conditioning period, even a drummer with perfect technique can find themselves with sore hands and fresh blisters after a marathon session.
Prevention: The Best Way to Deal with Drumming Blisters
Proactive prevention is unequivocally the best strategy for managing blisters from drumming.
While treatment is necessary for existing injuries, developing habits and techniques that stop blisters from ever forming is the key to uninterrupted playing.
This involves a three-pronged approach: mastering your grip, choosing the right equipment, and practicing diligent hand care.
Mastering Your Grip
The single most effective preventative measure against blisters from drumming is to consciously cultivate a relaxed, fluid grip.
Think of holding a small bird: your grip must be firm enough that it cannot escape, but gentle enough that you do not harm it.
This is the level of tension you should aim for with your drumsticks.
A relaxed grip allows the stick to become an extension of your hand, not a foreign object being forced into submission.
It enables the stick to pivot naturally at the fulcrum and absorb the energy of the rebound, which you can then channel into your next stroke.
This efficiency of motion dramatically reduces the amount of friction your skin endures.
Identifying and utilizing the correct fulcrum, or balance point, is essential for minimizing stick friction and maximizing control.
The fulcrum is the point where the stick pivots.
For most matched grips, this is between the thumb and the first or second finger.
When you allow the stick to balance and pivot at this point, the rest of your fingers can simply guide the stick with minimal pressure.
This prevents the entire length of your fingers from rubbing against the wood with every stroke.
Spend time simply balancing the stick in your hand without playing to feel this natural pivot point.
Adopting a relaxed approach within established grip techniques like the American, French, or German matched grips provides a framework for blister-free playing.
Each technique has its own mechanics, but all rely on the principle of relaxation for speed, power, and endurance.
To improve your grip, incorporate specific exercises into your practice routine.
- Simple Rebound Practice:
- On a practice pad, throw the stick down with a single wrist motion and let it bounce as many times as it can while you maintain a very light grip.
- Your goal is to not interfere with the natural bounce.
- Finger Control Drills:
- Hold the sticks in playing position and use only your fingers to “dribble” the stick on the pad.
- This builds control in the muscles that provide finesse, reducing the need for a full, tight grip.
- The “Drop and Catch”:
- Practice throwing a stick from one hand to the other.
- To catch it successfully without it stinging your hand, you must instinctively absorb the impact with a relaxed grip.
- This teaches your hands the feeling of receiving energy without tension.
Choosing the Right Gear
Selecting drumsticks that are ergonomically suited to your hand size and playing style is a critical step in blister prevention.
There is no single “best” stick; the right choice is highly personal.
A stick that is too heavy will cause fatigue and force you to grip harder, while a stick that is too light might not provide enough rebound, also leading to a tighter grip.
Visit a music store and hold various models.
Pay attention to the diameter, length, weight, and taper.
The right pair of sticks should feel like a natural extension of your hands.
Drumstick wraps and tapes present a double-edged sword; they can provide cushioning but may also increase the coefficient of friction.
For some players, a soft cloth tape can absorb sweat and provide a comfortable buffer.
For others, a rubbery grip tape will create more friction than bare wood, leading to worse blisters.
If you choose to use a wrap, experiment with different materials to find one that works for you.
A good alternative for those who need extra grip without the friction is to use a light coating of stick wax.
For drummers who are particularly susceptible to blisters or play with extreme intensity, drumming gloves offer a reliable barrier of protection.
Modern drumming gloves are designed to be thin and flexible, preserving much of the feel of the stick while absorbing sweat and completely eliminating skin-on-wood friction.
The downsides can include a slight loss of sensitivity and the cost of the gloves themselves.
However, for a drummer playing a long tour with multiple shows a night, gloves can be an essential tool for hand preservation.
Protective Measures & Hand Care
Proactively applying athletic tape to known “hot spots” before playing can effectively preempt blister formation.
If you know you always get a blister on your index finger, wrap a single, smooth layer of tape around that area before you even pick up your sticks.
Do not wrap it so tightly that it cuts off circulation.
The goal is to create a synthetic outer layer of “skin” that will take the abuse of the friction instead of your actual epidermis.
Maintaining dry hands by using magnesium carbonate (gymnastics chalk) or other specialized hand powders significantly reduces the friction caused by sweat.
Sweat acts as a lubricant initially, but as it works into your skin, it can soften the epidermis and make it much more susceptible to tearing.
A light dusting of chalk can keep your hands dry for an entire set, ensuring a more consistent and less abrasive grip.
Consistent moisturizing when you are not drumming is crucial for maintaining skin elasticity and preventing cracks that can lead to blisters.
While you want your hands to be dry during play, you want the skin itself to be healthy and supple the rest of the time.
Dry, brittle skin is prone to cracking and tearing.
Use a quality hand lotion or moisturizer daily, especially after washing your hands, to keep your skin in optimal condition.
Recommended Resource: Want to upgrade your gear for better comfort and performance? Explore our expert picks for the Best Drumsticks.
How to Treat Blisters from Drumming
Despite the best preventative efforts, blisters can sometimes still occur, especially during unexpectedly long or intense sessions.
When this happens, proper and immediate treatment is crucial to minimize pain, prevent infection, and ensure a quick return to playing.
Immediate First Aid
When you feel the distinct sting of a forming blister, the most prudent course of action is to stop playing immediately to prevent further damage.
“Playing through the pain” is a common temptation, but it will almost always make the blister larger, more painful, and more likely to tear open, significantly increasing healing time and the risk of infection.
If you are in the middle of a performance and cannot stop, try to adjust your grip to relieve pressure on the affected spot, but address the blister as soon as your set is over.
Properly cleaning a new blister and the surrounding skin is the first and most critical step in preventing infection.
Gently wash the area with mild soap and lukewarm water, and pat it dry with a clean towel.
Avoid scrubbing the area, as this can easily tear the delicate skin of the blister.
If you do not have access to soap and water, an alcohol-free antiseptic wipe can be used.
The standard medical advice is to avoid popping a blister.
The intact skin and the fluid inside create a sterile environment that protects the new, sensitive skin growing underneath.
Popping it exposes this vulnerable area to bacteria.
However, if a blister is very large, located in a high-pressure area, and is so painful that it restricts movement, it may be necessary to drain it to relieve pressure.
If you must drain a blister, follow these steps precisely:
- Wash your hands and the blister thoroughly with soap and water.
- Sterilize a sharp needle with rubbing alcohol.
- Carefully pierce a small hole at the edge of the blister.
- Gently press on the blister with clean gauze to drain the fluid.
- Do not remove the overlying “roof” of skin. This flap of skin is a natural bandage.
- Apply an antibiotic ointment and cover with a sterile bandage.
Healing and Getting Back to the Kit
Protecting a healing blister with appropriate dressings is essential for both comfort and infection prevention.
For an intact or freshly drained blister, a hydrocolloid bandage (often marketed as a “blister bandage” or “second skin”) is an excellent choice.
These bandages create a moist, cushioned environment that promotes faster healing.
For an open or torn blister, use a sterile, non-stick pad held in place with medical tape.
Change the bandage daily or anytime it becomes wet or dirty.
Applying a thin layer of antibiotic ointment is highly recommended if a blister has burst, creating an open wound vulnerable to bacteria.
The ointment helps to prevent infection and can keep the bandage from sticking to the healing wound.
Reapply a small amount with each bandage change until the skin has closed over.
Allowing your skin adequate time to heal is a non-negotiable part of the recovery process that prevents chronic issues.
Rushing back to playing on a raw, unhealed blister will only cause further damage and significantly delay the formation of a protective callus.
Depending on the severity of the blister, this could mean taking one to several days off from playing.
Listen to your body; if it hurts, it’s not ready.
The Journey from Blisters to Calluses
The ultimate goal of hand conditioning for a drummer is not to avoid friction entirely, but to build up the skin’s natural defense against it.
This defense comes in the form of calluses, a badge of honor earned through dedicated and intelligent practice.
Understanding Drum Calluses
A drum callus is a thickened, hardened area of skin that develops as a natural, protective adaptation to the repeated friction and pressure of drumming.
As you play consistently, your body recognizes that certain areas of your hands are under constant stress.
In response, it stimulates the production of keratin, a hard, protective protein.
This results in the tough, leathery patches of skin that define a seasoned player’s hands.
These drumming calluses are the body’s perfect, custom-molded solution to the problem of friction.
| Feature | Blister | Callus |
|---|---|---|
| Cause | Intense, sudden friction on soft skin | Gradual, consistent friction on conditioned skin |
| Sensation | Painful, sharp, stinging | Numb, tough, sometimes itchy |
| Appearance | Raised bubble filled with clear fluid | Thickened, hardened, yellowish patch of skin |
| Function | Emergency cushioning for an injury | Long-term protective armor |
| Desirability | Undesirable; a sign of injury | Desirable; a sign of conditioning |
Well-formed drumming calluses act as the body’s own durable, built-in gloves, effectively shielding the underlying sensitive skin from the friction that causes blisters.
Once you have developed calluses in your primary grip locations, you will find that you can play for much longer periods without any pain or irritation.
Conversely, the presence of thick, painful, or poorly placed calluses can be an indicator of persistent flaws in your grip or technique that are still creating excessive pressure points.
Neglected calluses can also become overly thick and brittle, leading to painful cracking, which can be just as debilitating as a blister.
How to Build and Maintain Healthy Calluses
The key to developing protective calluses instead of painful blisters is to increase your playing time gradually and consistently.
Instead of jumping from 20-minute sessions to a 2-hour jam, add five or ten minutes to your practice time every few days.
This “low and slow” approach gives your skin time to adapt and thicken, rather than separate and blister.
If you feel a “hot spot” forming, stop for the day.
This is the signal that you have reached your skin’s current limit.
Resisting the urge to pick at a healing blister or a forming callus is paramount to allow the skin to toughen naturally.
When a blister heals, leave the top layer of skin intact for as long as possible.
This dead skin acts as a protective layer for the new skin underneath, which will become the foundation of your callus.
Picking at it exposes the raw skin too early, restarting the healing process.
Proper callus maintenance is essential to keep them protective rather than problematic.
A healthy callus is tough but flexible.
If a callus becomes too thick and hard, it can lose its flexibility and crack.
To prevent this, gently file it down with a pumice stone or emery board every so often.
Furthermore, continue to moisturize your hands daily.
While this may seem counterintuitive, moisturized calluses are less likely to become brittle and crack.
The goal is a hand that is tough where it counts, but healthy and supple overall.
Conclusion & Key Takeaways
The path to blister-free drumming revolves around three core principles: cultivating a relaxed grip, utilizing appropriate equipment, and practicing diligent hand care.
While the appearance of a painful blister can feel like a major setback, it is more accurately a form of feedback from your body. It is a clear signal that an aspect of your technique or routine needs adjustment.
By heeding this feedback and implementing the strategies outlined in this guide, you can transform your hands from a source of pain into a resilient and reliable asset.
Ultimately, blisters from drumming should be viewed not as an inevitable curse, but as a temporary and solvable problem on the journey to becoming a more skilled and fluid musician.
Embrace the process of refining your technique, be patient as your hands adapt, and treat them with the care they deserve.
In time, the painful blisters will be replaced by hard-earned drum calluses, a testament to your dedication and the physical manifestation of countless hours spent joyfully behind the kit.
Leave a comment below sharing your own tips for dealing with drumming blisters!